
Transform Blocks
Overview
Transform blocks are the processing layer of a workflow. They define how data or documents are transformed, categorized, routed, or enriched before being passed on to the next step.
These blocks can perform AI-based classification, conditional routing, or manual intervention when needed.
| Block | Description | Typical Use Case |
|---|---|---|
| Data Extraction | Extracts structured data from a document based on a defined extraction model. | When processing uploaded invoices, bank statements, or IDs to extract fields like Name, Amount, or Account Number. |
| Merge JSON | Merges multiple incoming JSON data objects into a single JSON. | Useful when combining multiple document outputs into one unified dataset before processing. |
| Python Code | Executes custom Python logic using input data as context. | When you need to apply custom validation rules, data transformations, or computations. |
| Categorize with AI | Categorizes data fields or rows into preset categories using AI. | Auto-categorize transactions in bank statements or classify expense types. |
| Document Type Classifier | Automatically classifies incoming documents into types. | Identifies whether a file is an invoice, bank statement, or purchase order before extraction. |
| Human in the Loop | Pauses the workflow for human verification or manual decision. | When confidence is low and a human needs to validate or approve extracted data. |
| Router | Adds IF-ELSE conditional logic and routes data to the right path based on defined criteria. | When workflow branches depend on document attributes like credit score or document type. |
| External API | Sends extracted data to external systems and uses API responses to enrich or transform workflow outputs. | Validate vendors, perform compliance checks, enrich data, or drive workflow decisions using third-party or internal APIs. |
| Export Block | Generates export-ready structured data from all documents with configurable format and preview. | Combine multi-document data into a single downloadable output for reporting or downstream system ingestion. |
| Case Update | Updates a case's fields, stage, status or assignee. On a workflow without a case, updates the cases you point it at. | Sync transformed values back into cases, or mark cases as processed after an export. |
| Validation Block | Defines custom validations using prompts and displays results in the Case Overview Validation tab. Case workflows only. | Enforce mandatory fields, cross-field checks, and business rules across documents. |
| Summarise with AI | Generates a high-level AI summary of selected blocks or workflow parts. | Quickly understand complex workflows or share simplified workflow context with teammates. |
| Split with AI | Splits binder documents into respective document types using prompts and custom split logic. | Automatically separate invoices, packing lists, and shipping docs from multi-file binders. |
| LLM Block | Queries large language models to generate structured outputs and custom AI-driven logic. | Create derived fields, apply reasoning, classify cases, or generate insights across documents. |
| Parser Block | Converts raw text or API responses into structured data for downstream workflow logic. | Parse External API responses or unstructured text into fields usable for routing, validation, or case updates. |
| Lookup | Finds rows in an Entity/Table, or cases in a case type, that match your conditions, and hands the matches to later blocks. | Enrich a case against reference data, or find the case an emailed document belongs to. |
| Case Action | Deletes, retries or creates a case, or uploads a document to a case an earlier block found. | File an emailed document into its existing case; clean up cases a Lookup returned. |
| Table Write | Adds, updates, or deletes records in a table, and can link the record to the running case. | When each processed case should create or update a business record, such as registering a borrower from a loan application. |
Configuring Transform Blocks
Below are the available configuration options and example setups for each Transform Block.
Data Extraction Block
Configuration Steps:
-
Select Document Type: Choose the document type from the dropdown (e.g., US Bank Statement).
-
Run Test: Click Test Block to extract data and view the JSON output.
-
Review Output: Switch between JSON and Table view to verify extracted fields.
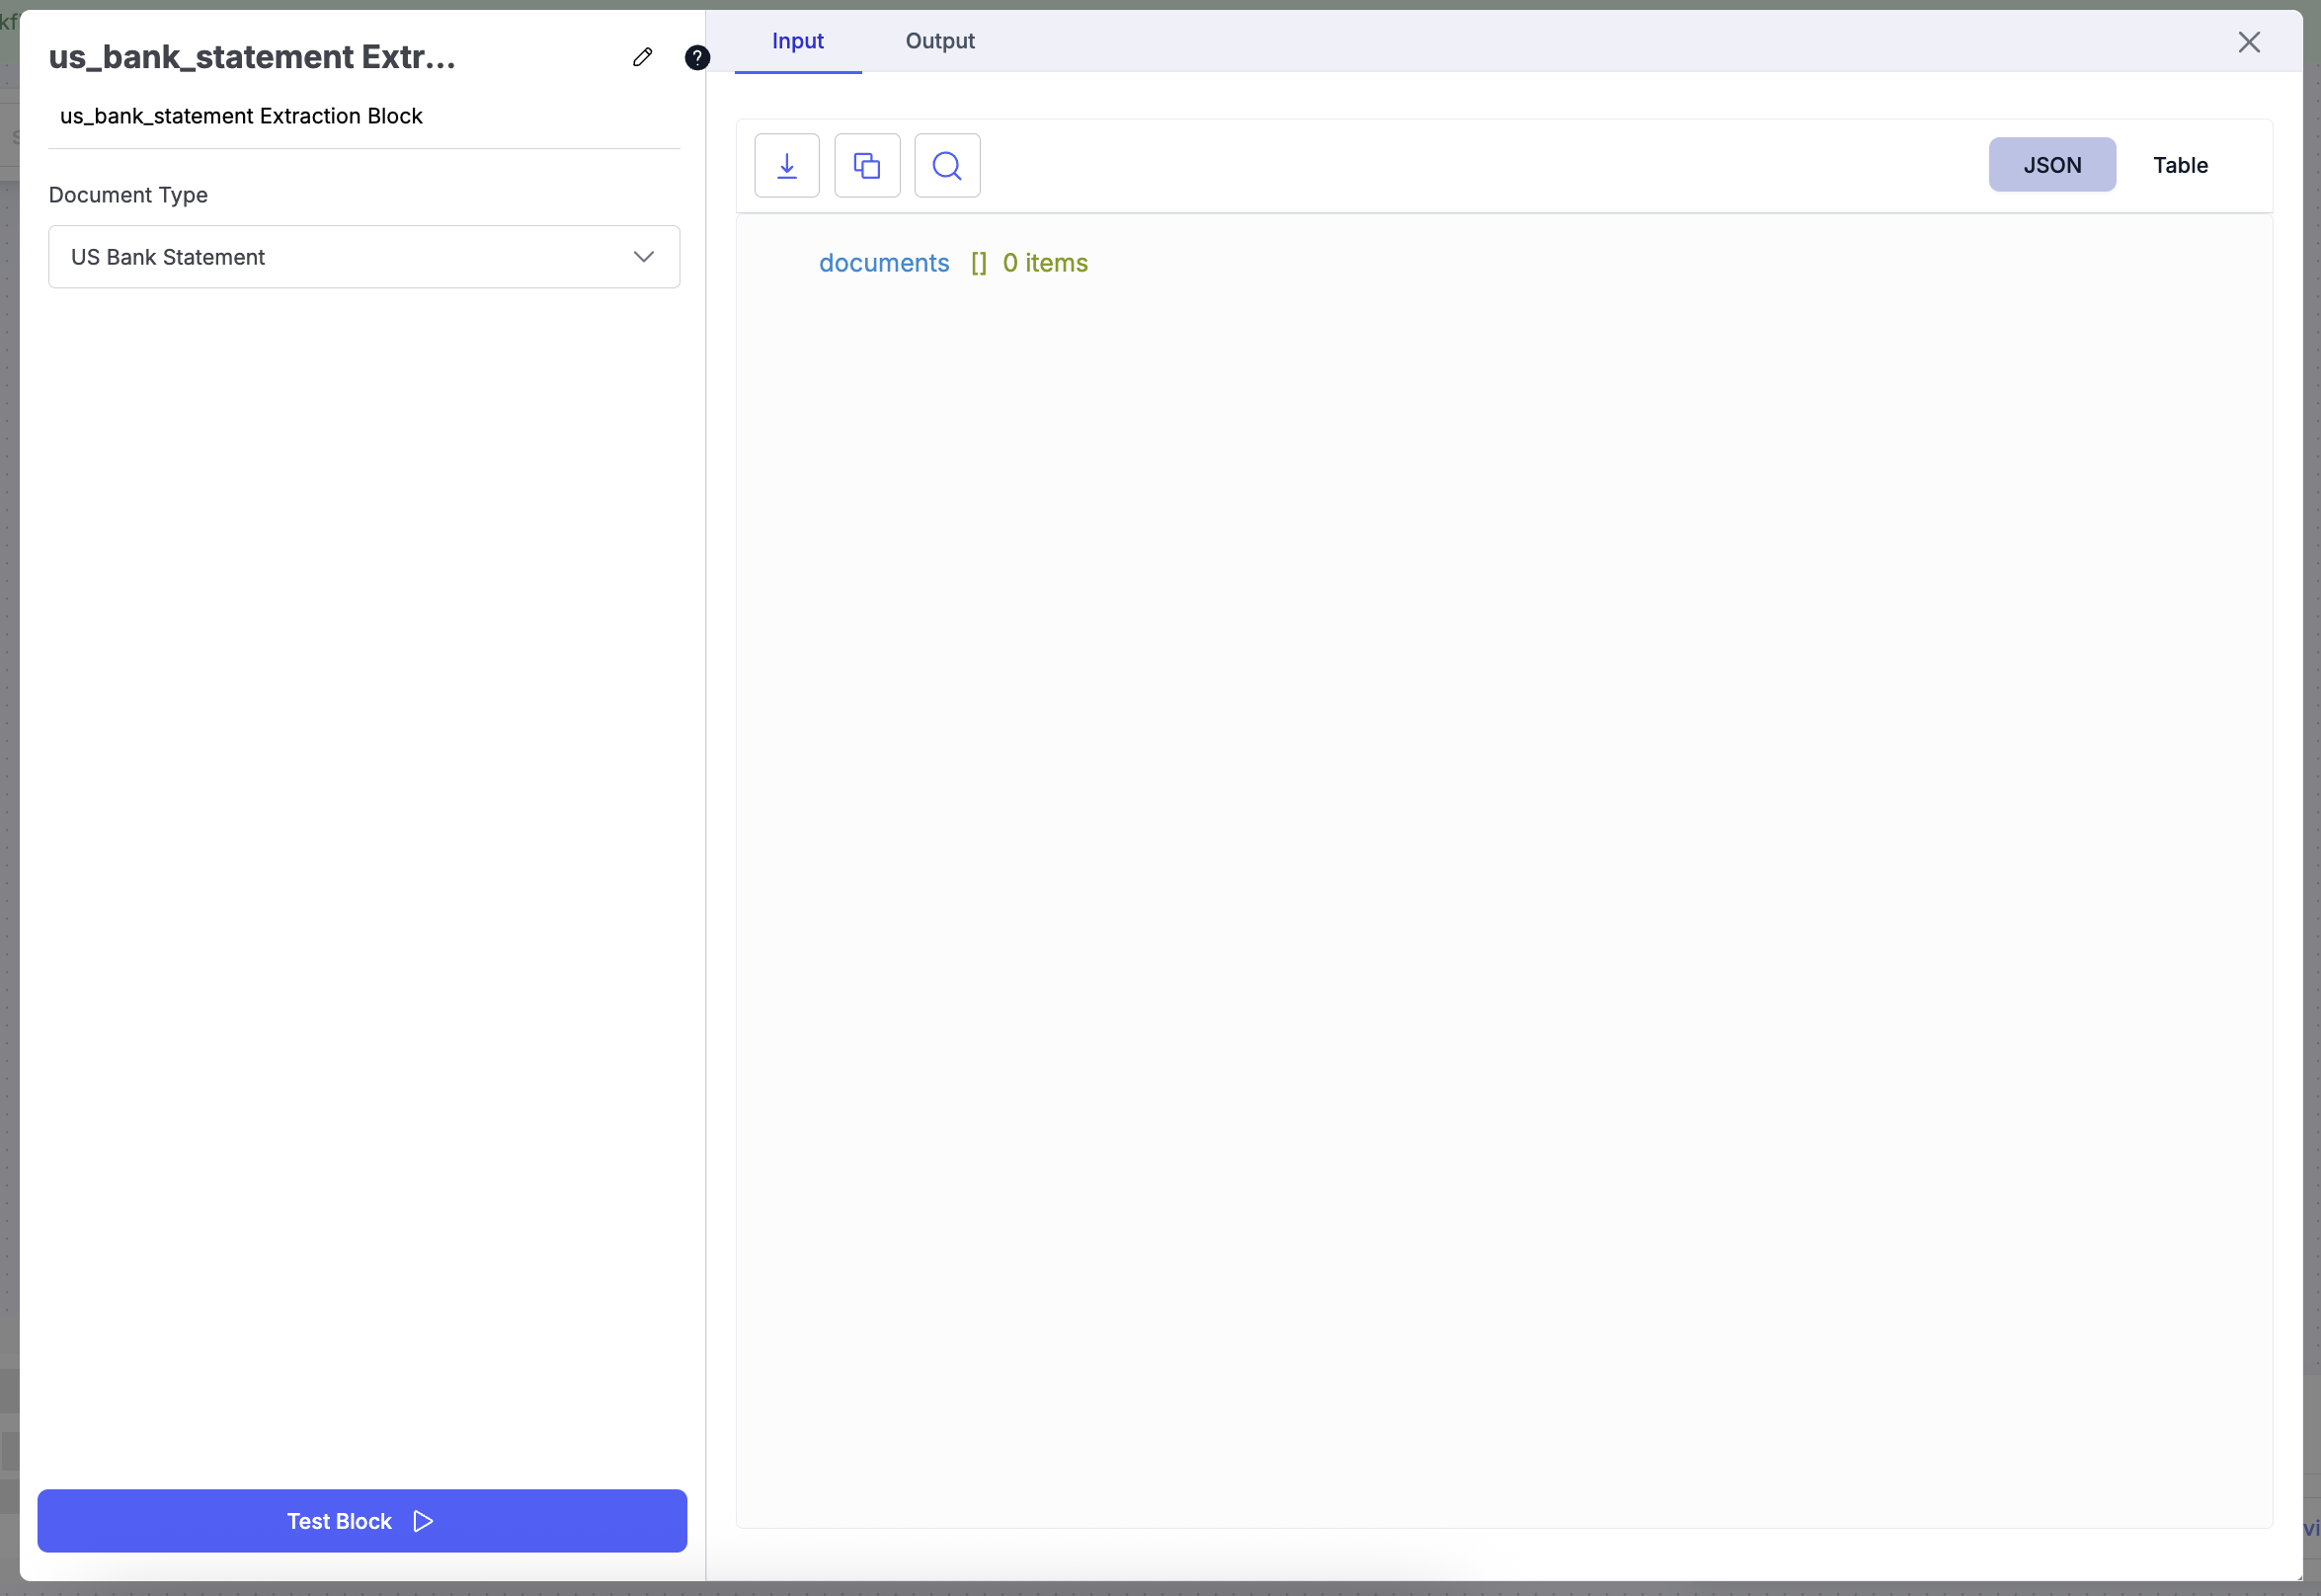
Example Use Case:
Extract bank details from uploaded statements:
{
  "account_name": "John Doe",
  "bank_name": "Chase Bank",
  "transactions": [...]
}
Merge JSON Block
Configuration Steps:
- Review Output: Test the merged output to ensure data structure integrity.
Categorize with AI Block
Configuration Steps:
-
Describe Categorization Rules: Define the logic for how AI should categorize data (e.g., loan type, borrower risk, or document class).
-
Import Categories: Optionally, import from an existing table and select relevant columns.
-
Test: Click Test Block to preview AI-generated categories.
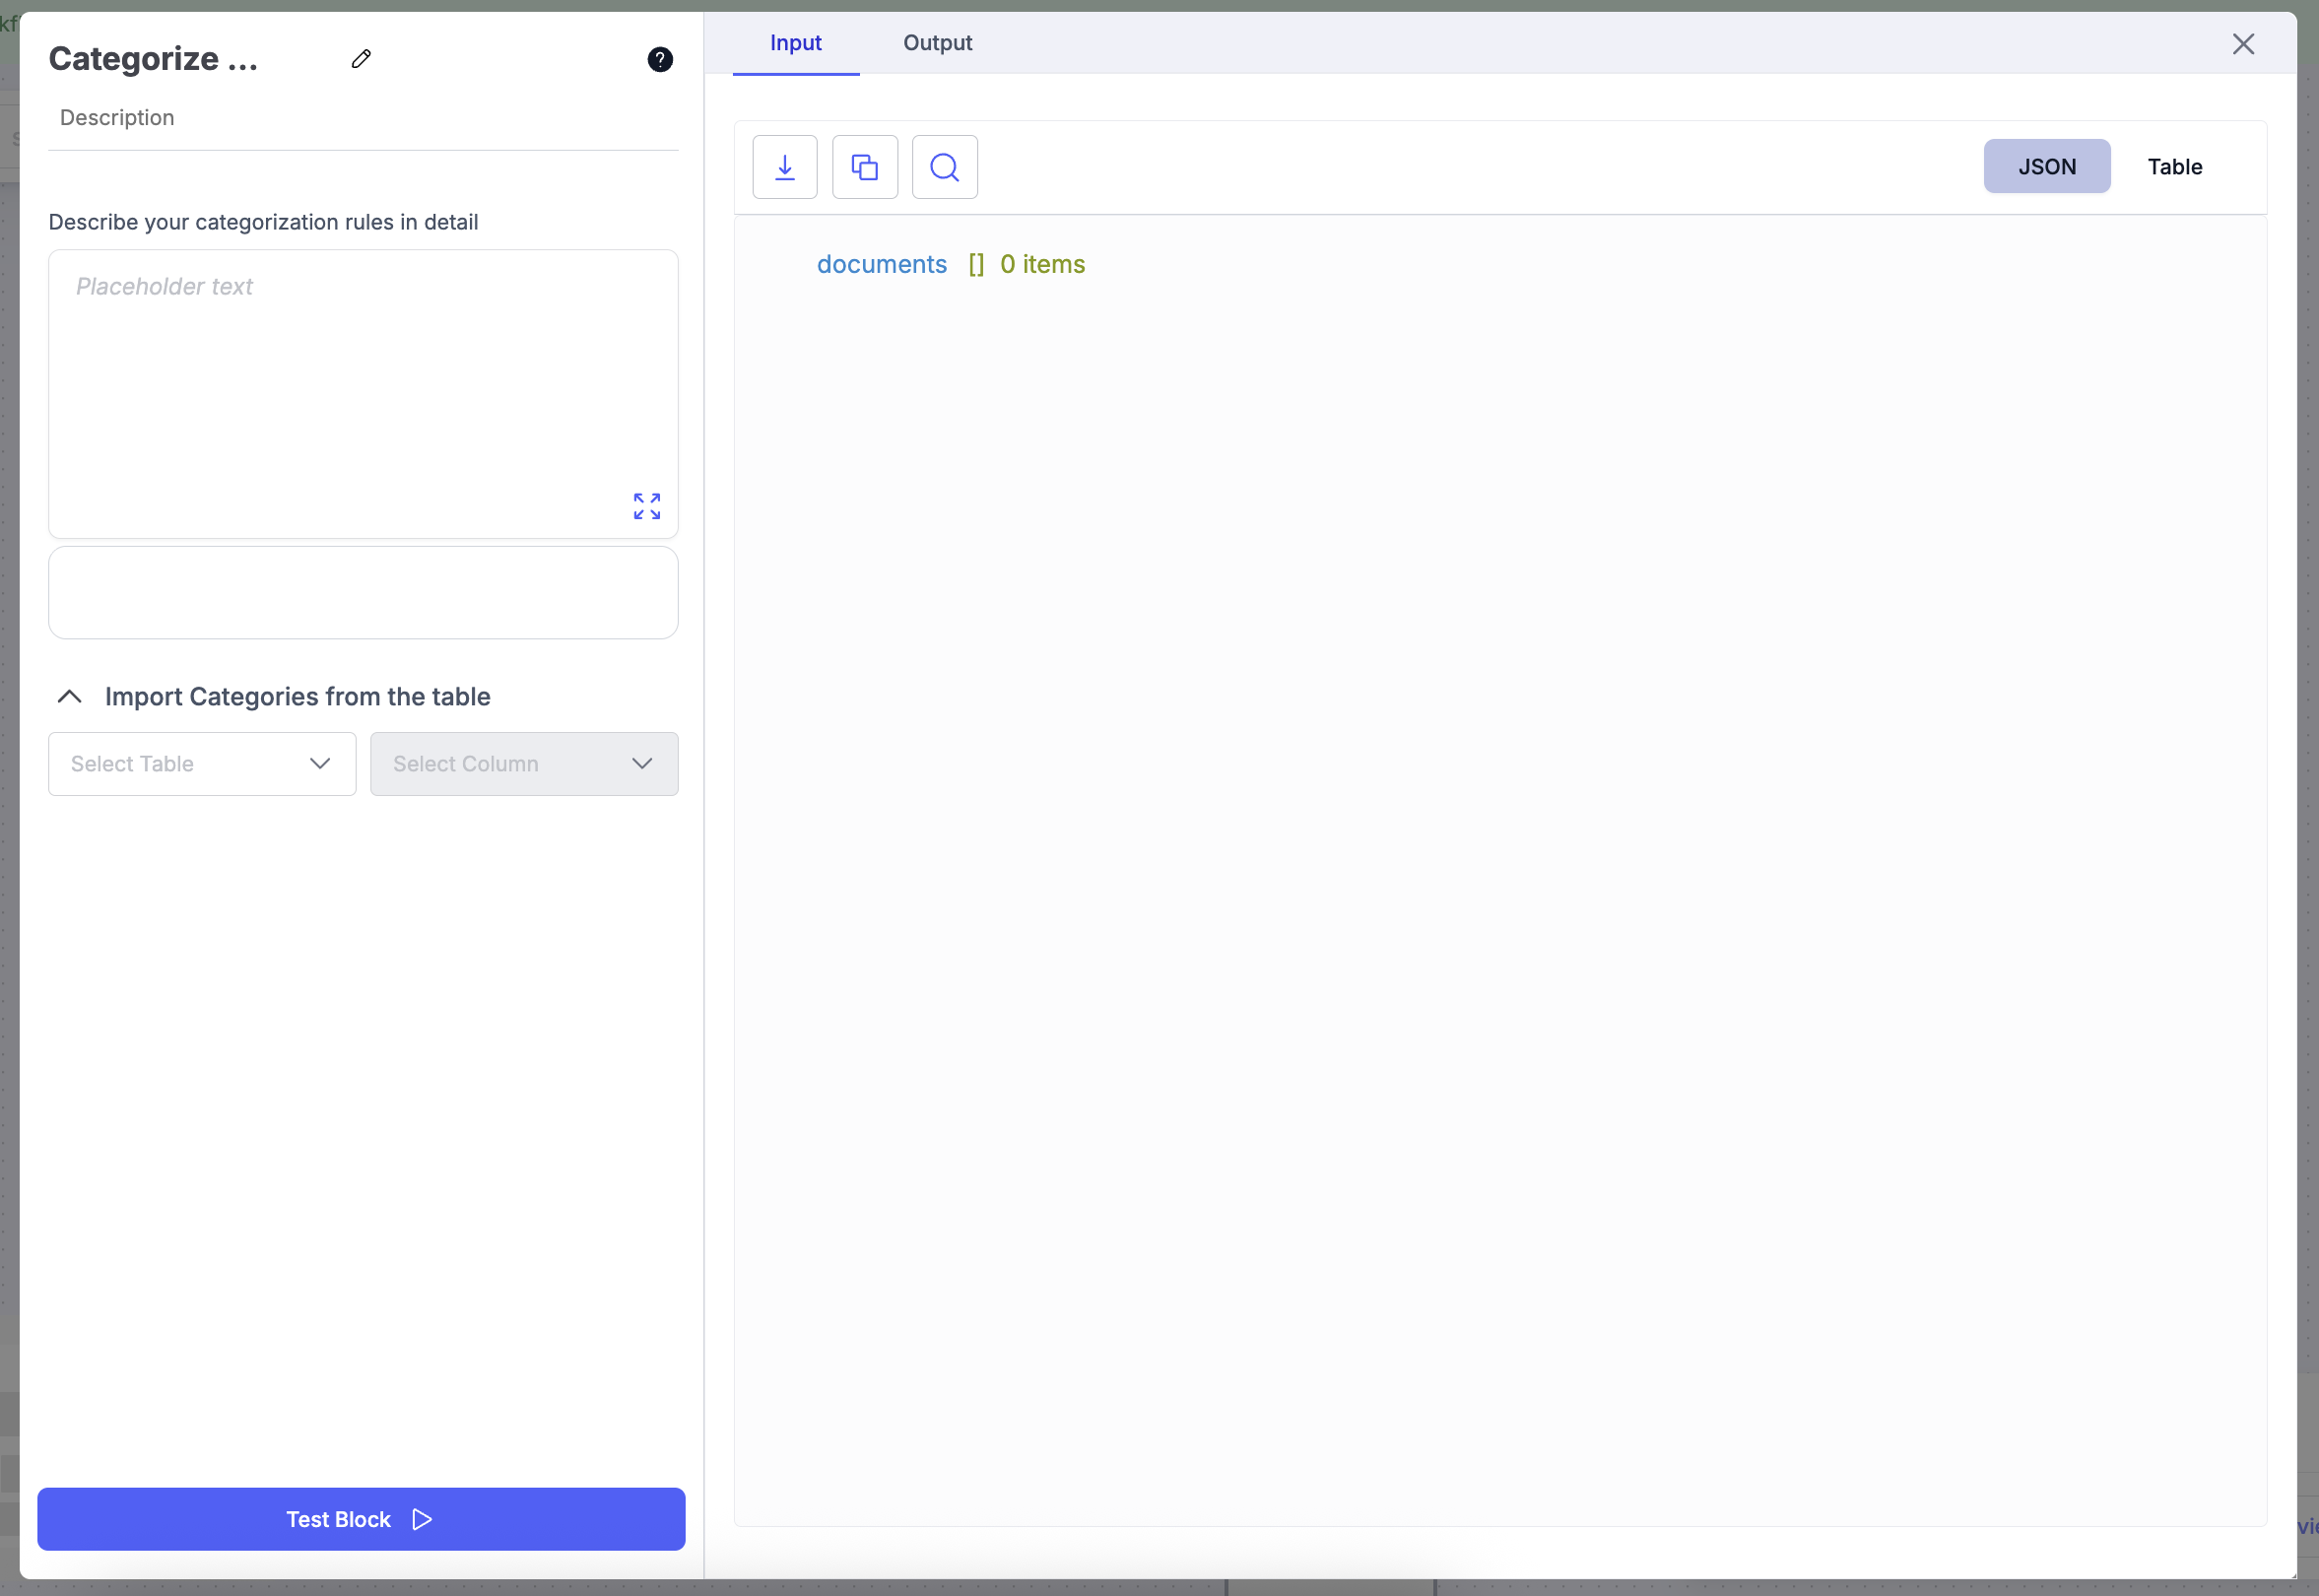
Example Use Case (SMB Lending):
Automatically categorize loan applications based on business type and risk profile:
| Description | Category |
|---|---|
| Credit Score ≥ 750 & Stable Revenue | Low Risk |
| Credit Score between 650–749 & Moderate Revenue | Medium Risk |
| Credit Score < 650 or High NSF Count | High Risk |
Split with AI
Split with AI allows you to automatically split binder documents containing multiple attached file types into their respective document types using an input prompt. You can also define custom split logic for each document type to control how files are separated during workflow execution.
Configuration Steps
- Open the Block Library → Transform.
- Select Split with AI.
- Enter an Input Prompt describing how the binder document should be split.
- Define Split Logic for each document type (for example, Invoice, Packing List, Bill of Lading).
- Review the configuration to ensure each document type is mapped correctly.
- Save the setup and apply the block to your workflow.
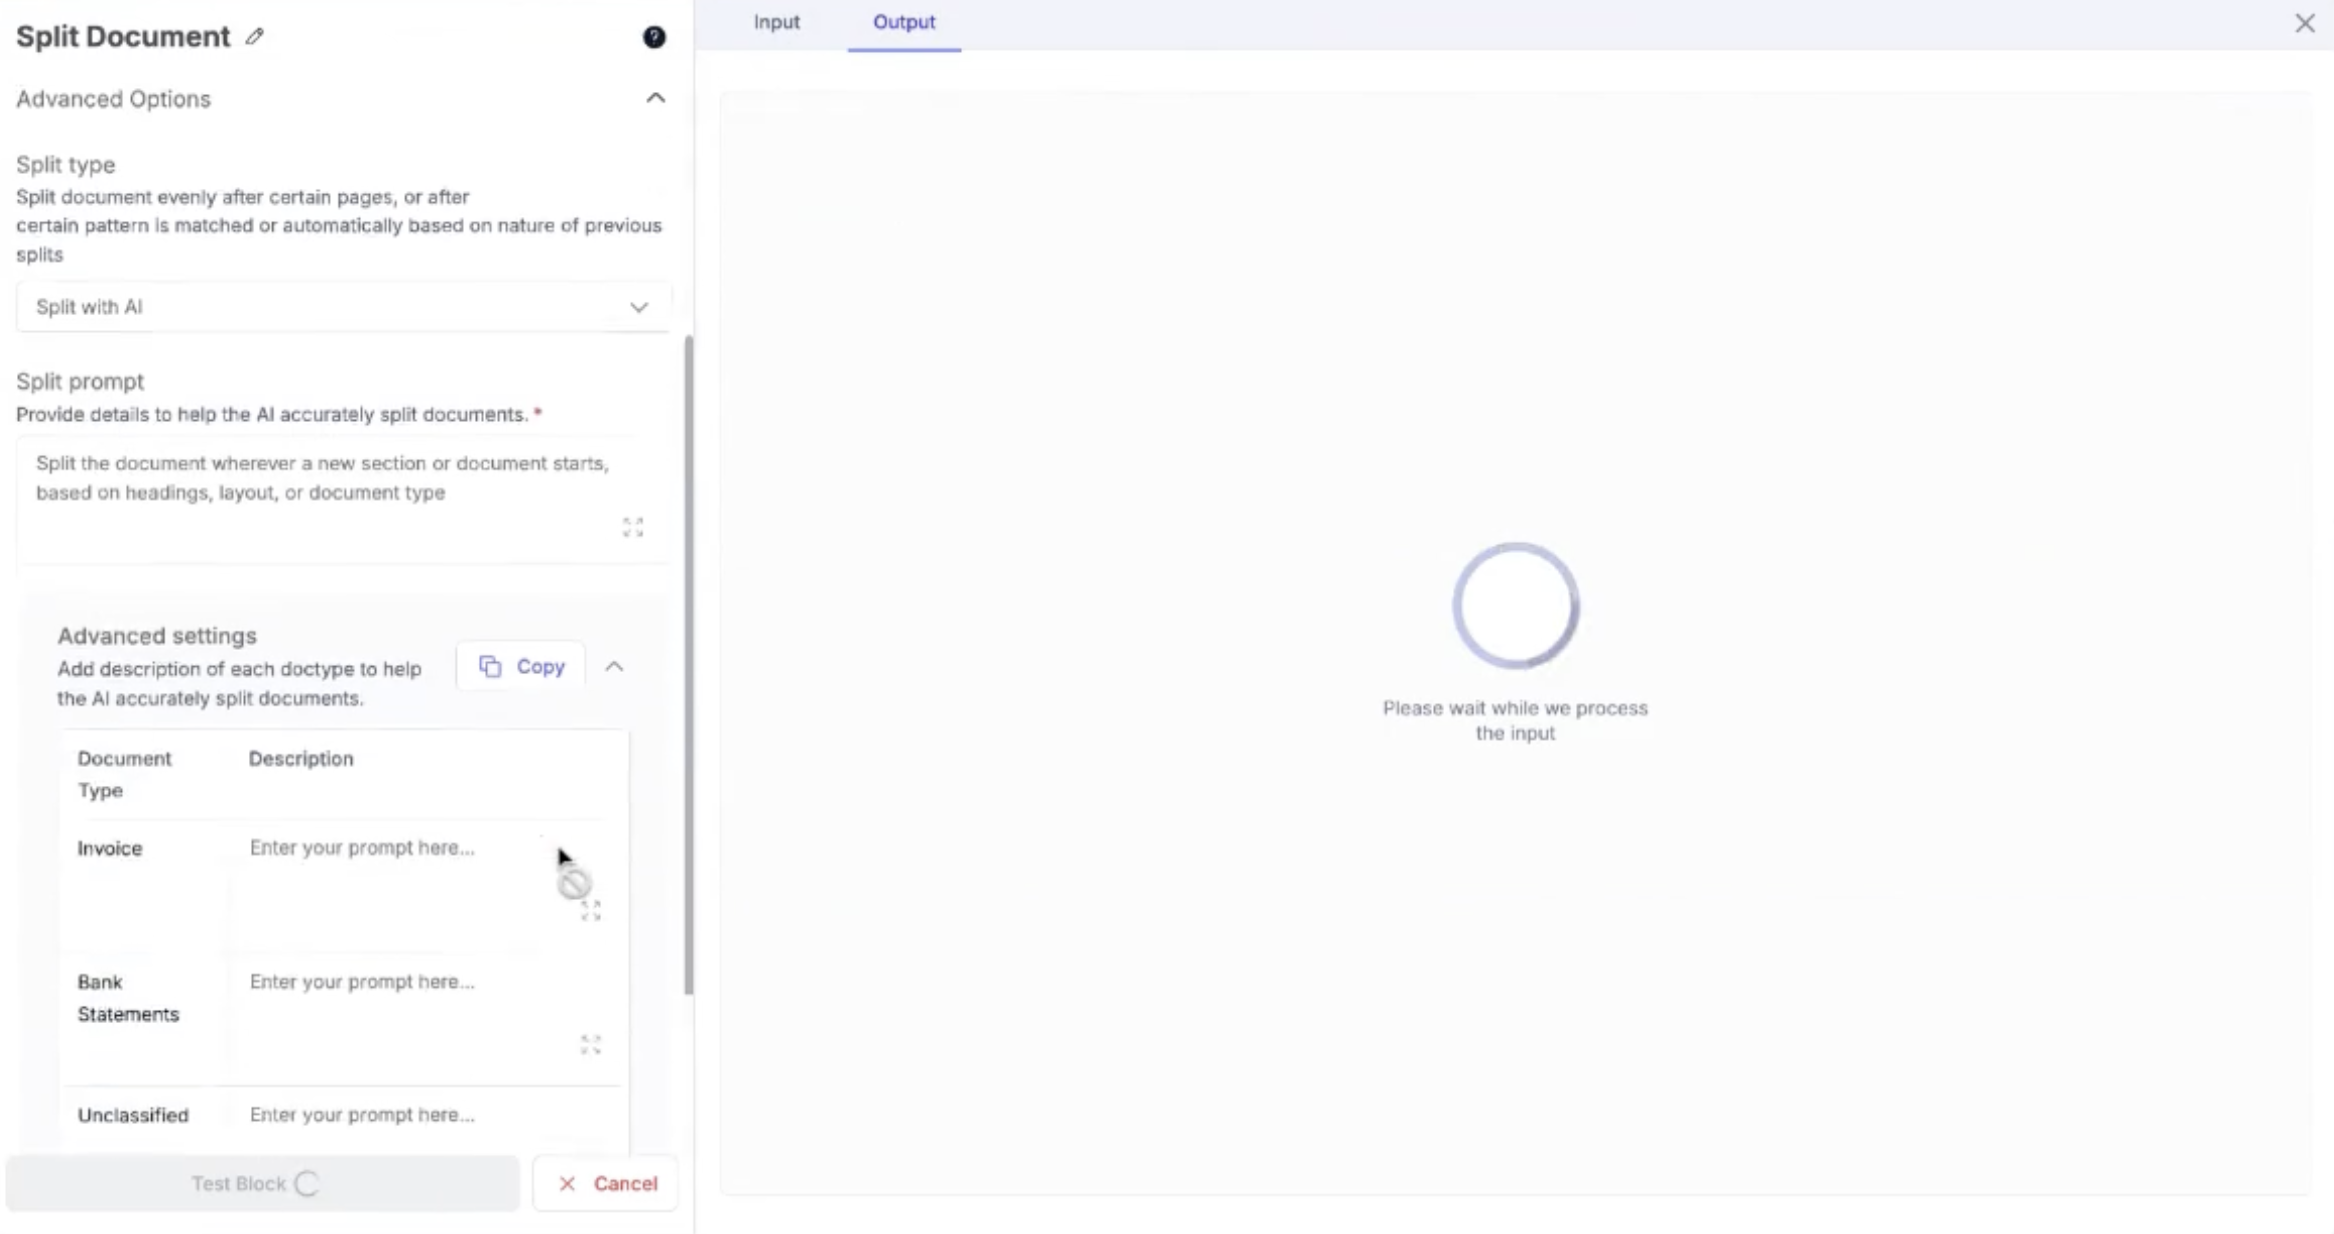
Example Use Case
Automatically split multi-document binders
For binder files containing multiple document types in a single upload, use Split with AI to:
- Separate invoices, packing lists, and shipping documents automatically
- Apply custom split rules for each document type
- Route each resulting document to the correct extraction or validation flow
- Eliminate manual document separation
This enables fully automated handling of multi-document uploads while maintaining accuracy and structure.
Document Type Classifier Block
Configuration Steps:
- Select Document Type: Choose the category or list of document types that the model should classify.
- Advanced option: Provide instructions to the model on how to classify the documents
- Review Classification: Validate predicted results before proceeding.
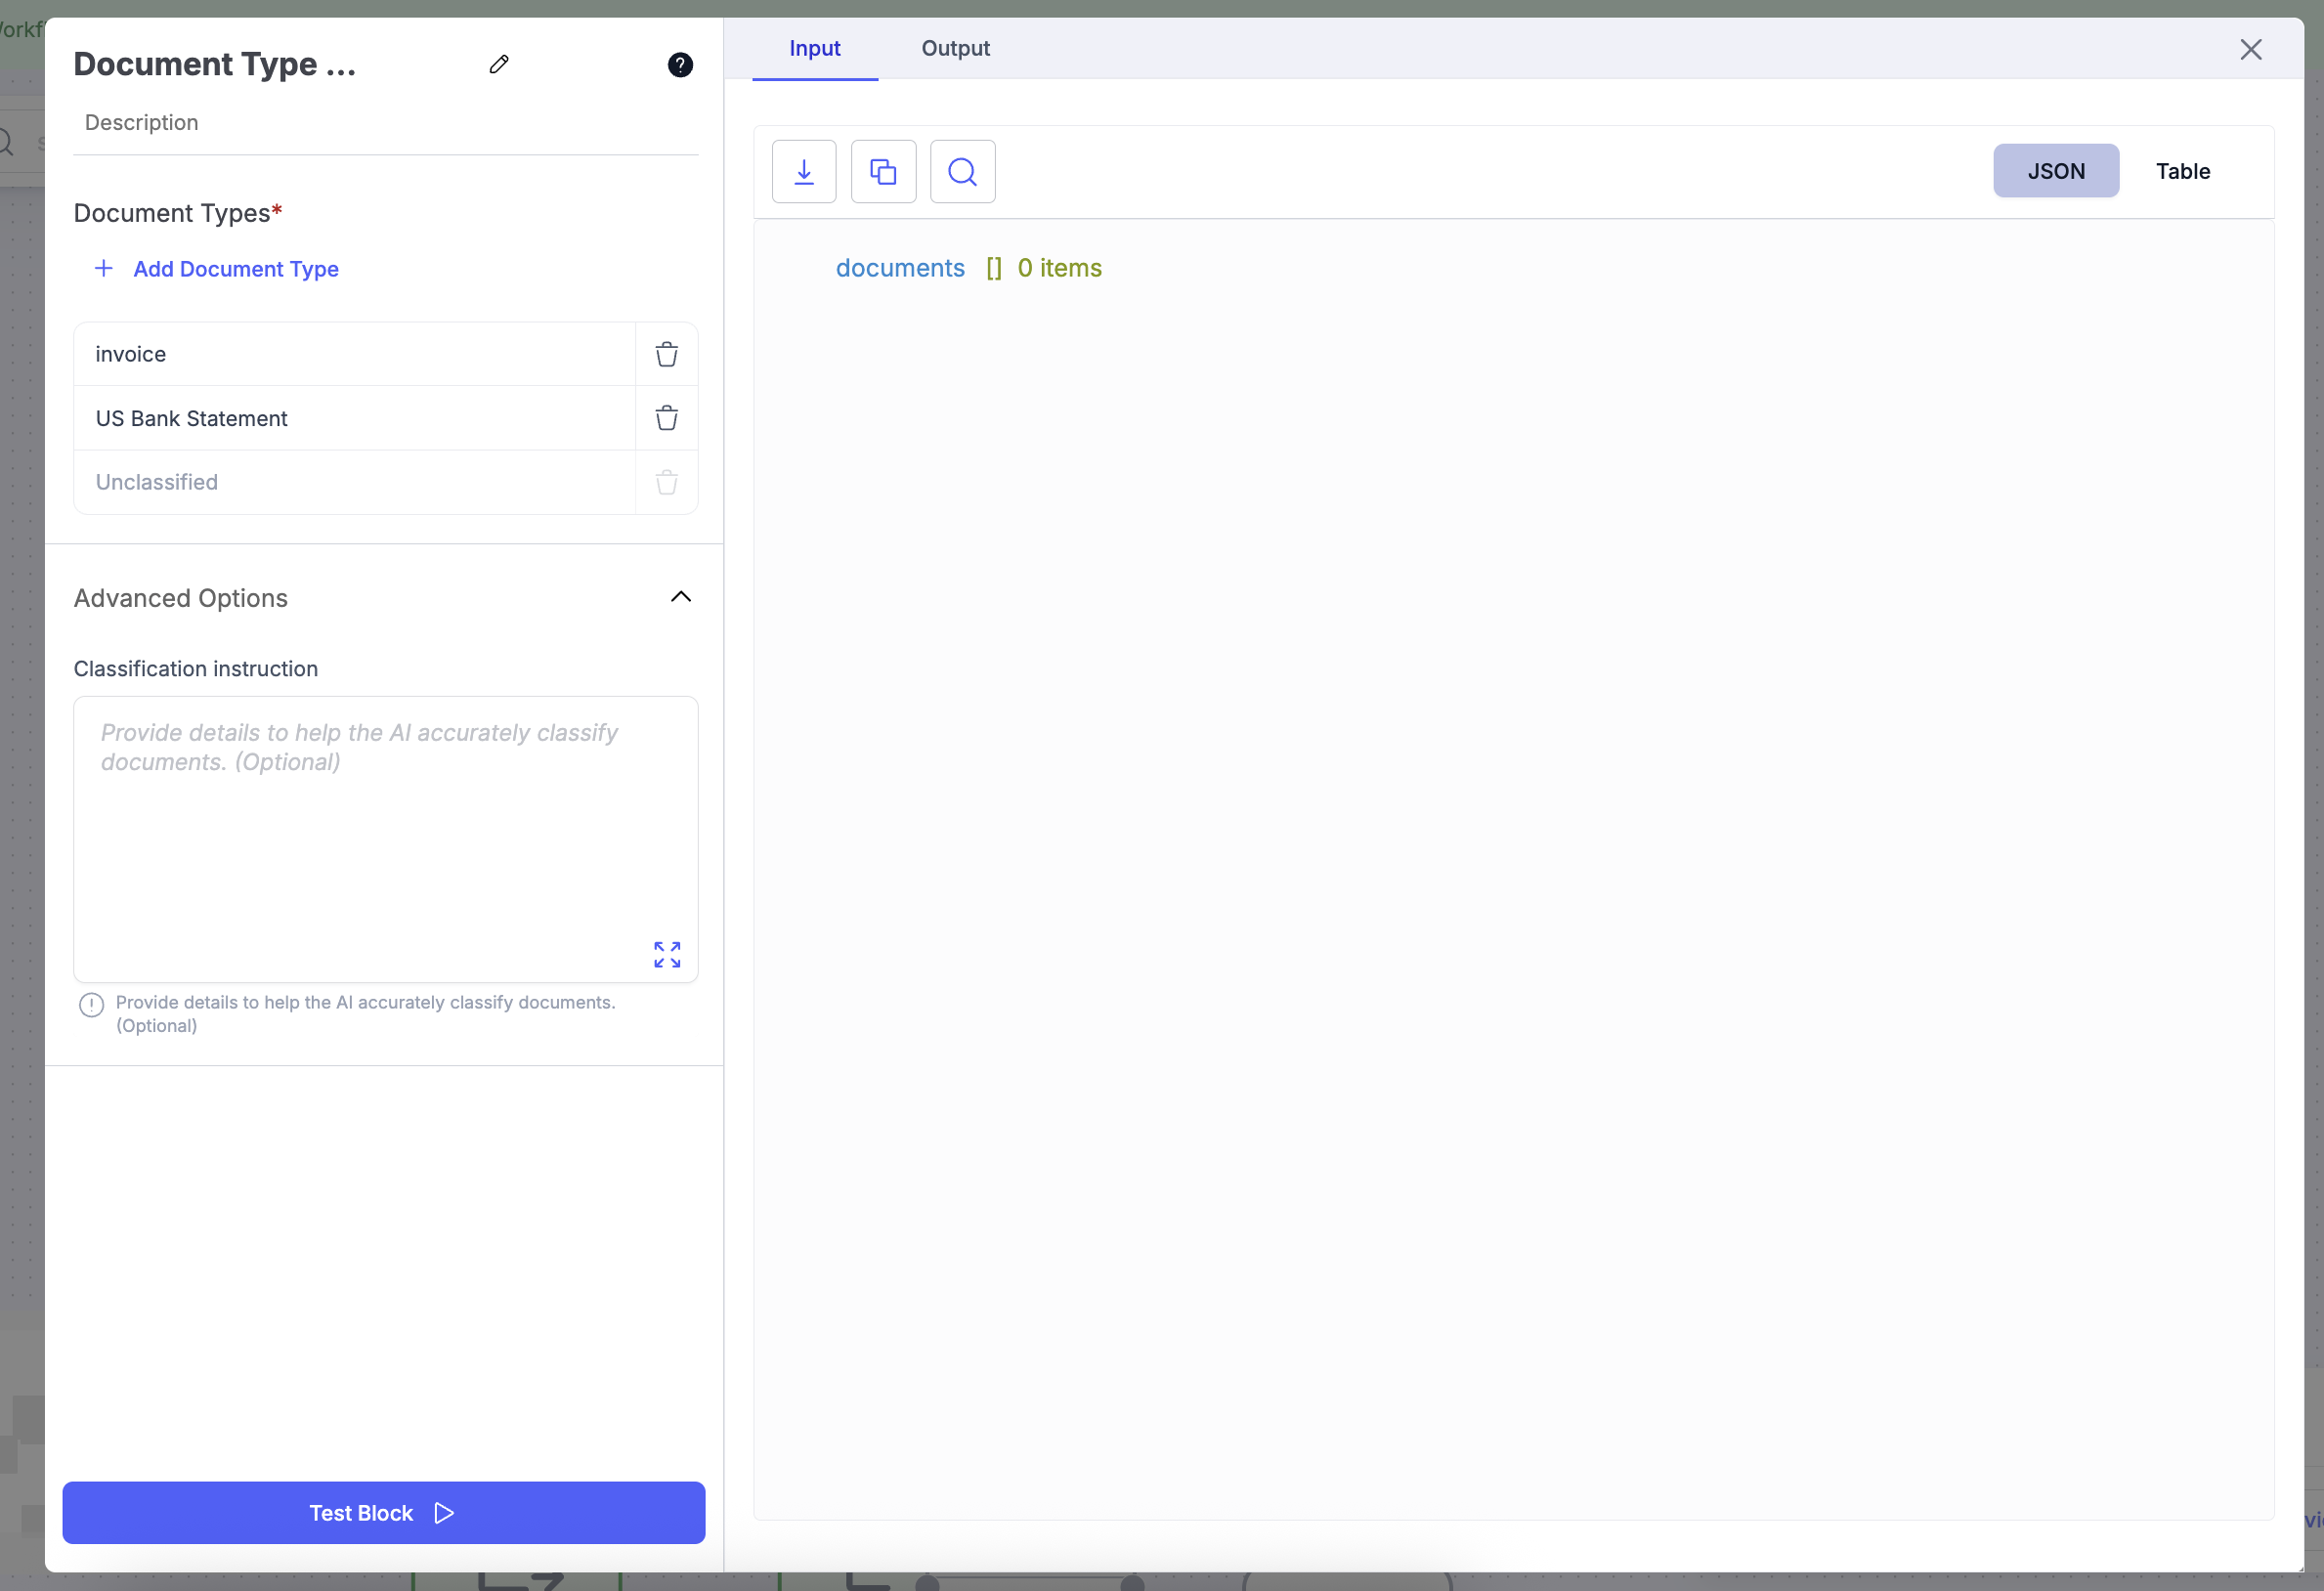
Example Use Case:
Automatically classify uploaded files into:
- Bank Statement
- Invoice
- Pay Slip
Python Code Block
Configuration Steps:
- Define Function Logic: Use the prompt input to automatically generate validation or transformation code, or manually write your own Python function inside the editor.
- Review and Edit: Modify the generated code as needed — for example, add conditional checks or data manipulations.
- Test Execution: Click Test Block to validate the output with sample input data.
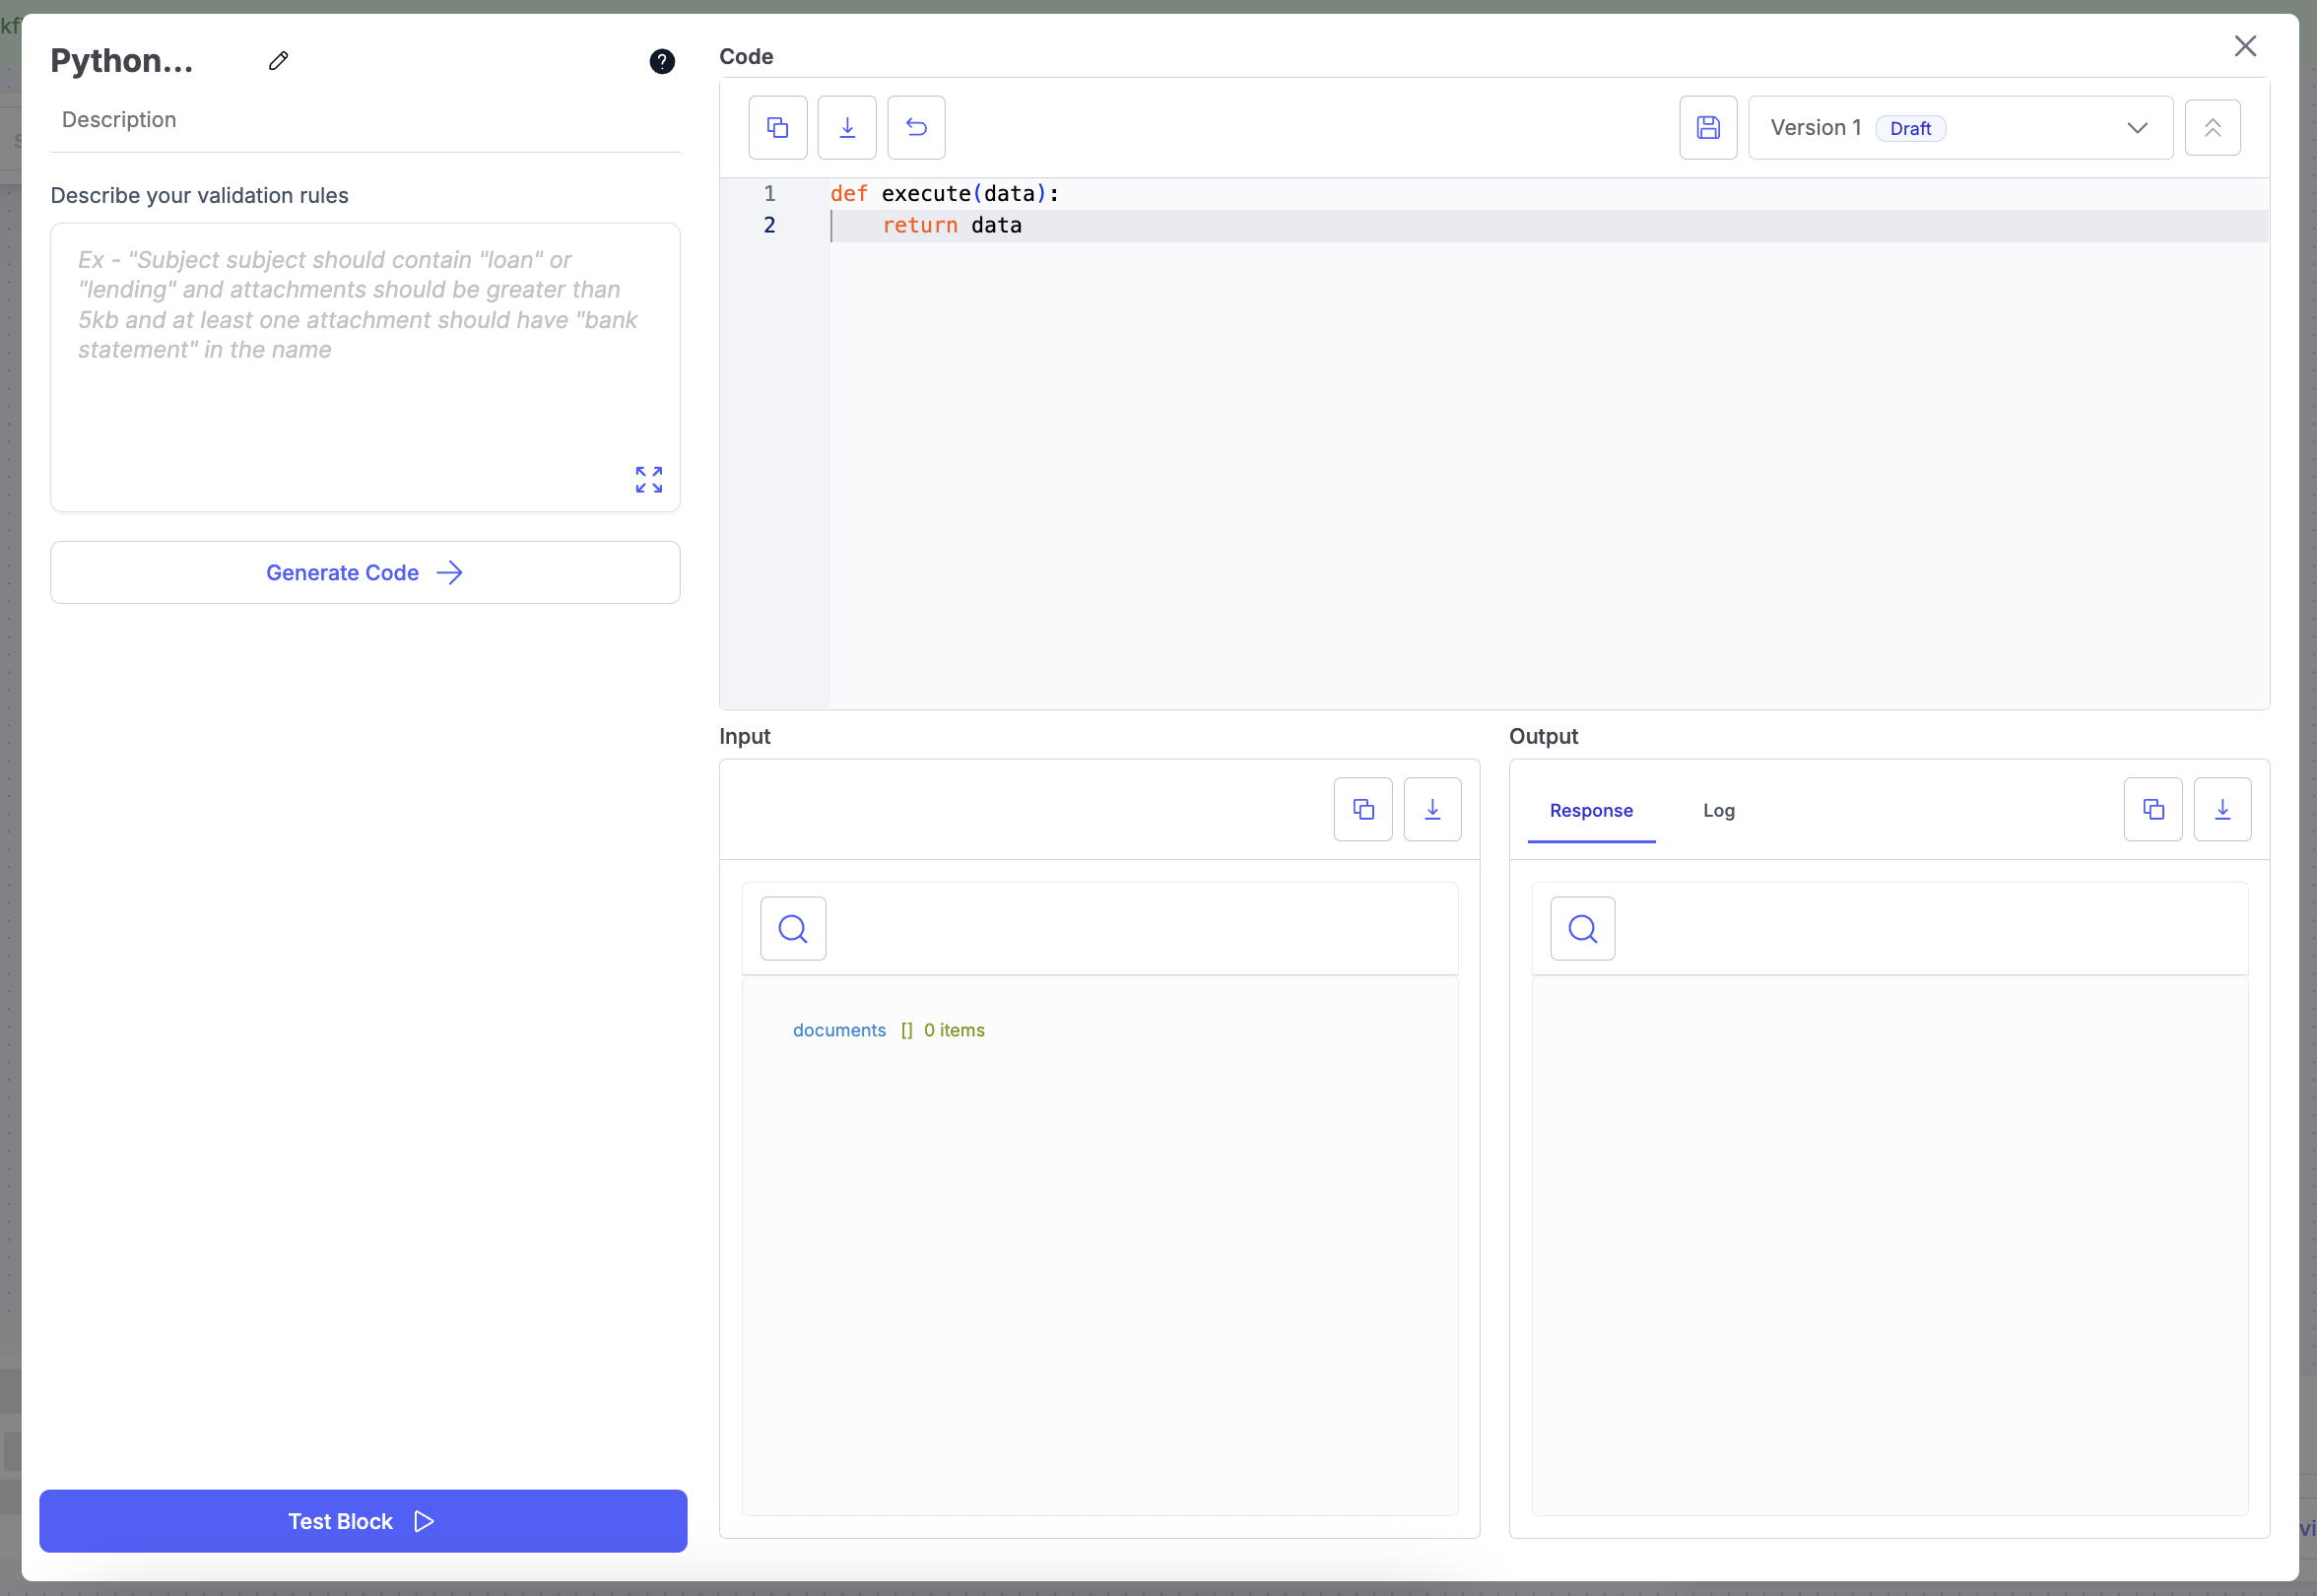
Example Use Case (SMB Lending):
Use Python to validate uploaded loan documents. This example verifies that the uploaded files contain bank statements before sending them for further processing.
def execute(data):
    # Example: Validate if uploaded documents contain 'bank statement'
    valid_docs = []
    for doc in data.get("documents", []):
        if "bank statement" in doc["name"].lower():
            valid_docs.append(doc)
    return {"valid_documents": valid_docs, "total_valid": len(valid_docs)}
Human in the Loop Block
Configuration Steps:
-
Select One or More Users: Choose the users who will review or approve the data output from previous blocks.
-
Select Assignment Mode: Decide how the task should be assigned — for example,
- Round Robin Broadcast – Tasks are assigned evenly among selected users in rotation.
(Useful for balancing workload across a review team.) - Sequential Broadcast – Tasks are assigned one user at a time based on priority order.
(Useful for hierarchical review or escalation flows.)
- Round Robin Broadcast – Tasks are assigned evenly among selected users in rotation.
-
Advanced Options:
- Notify Users: Enable to send email notifications to assigned reviewers.
- Rejection Reason Required: Require reviewers to provide a reason when rejecting a record.
-
Test Block:
Click Test Block to simulate the review workflow and ensure assignments work as expected.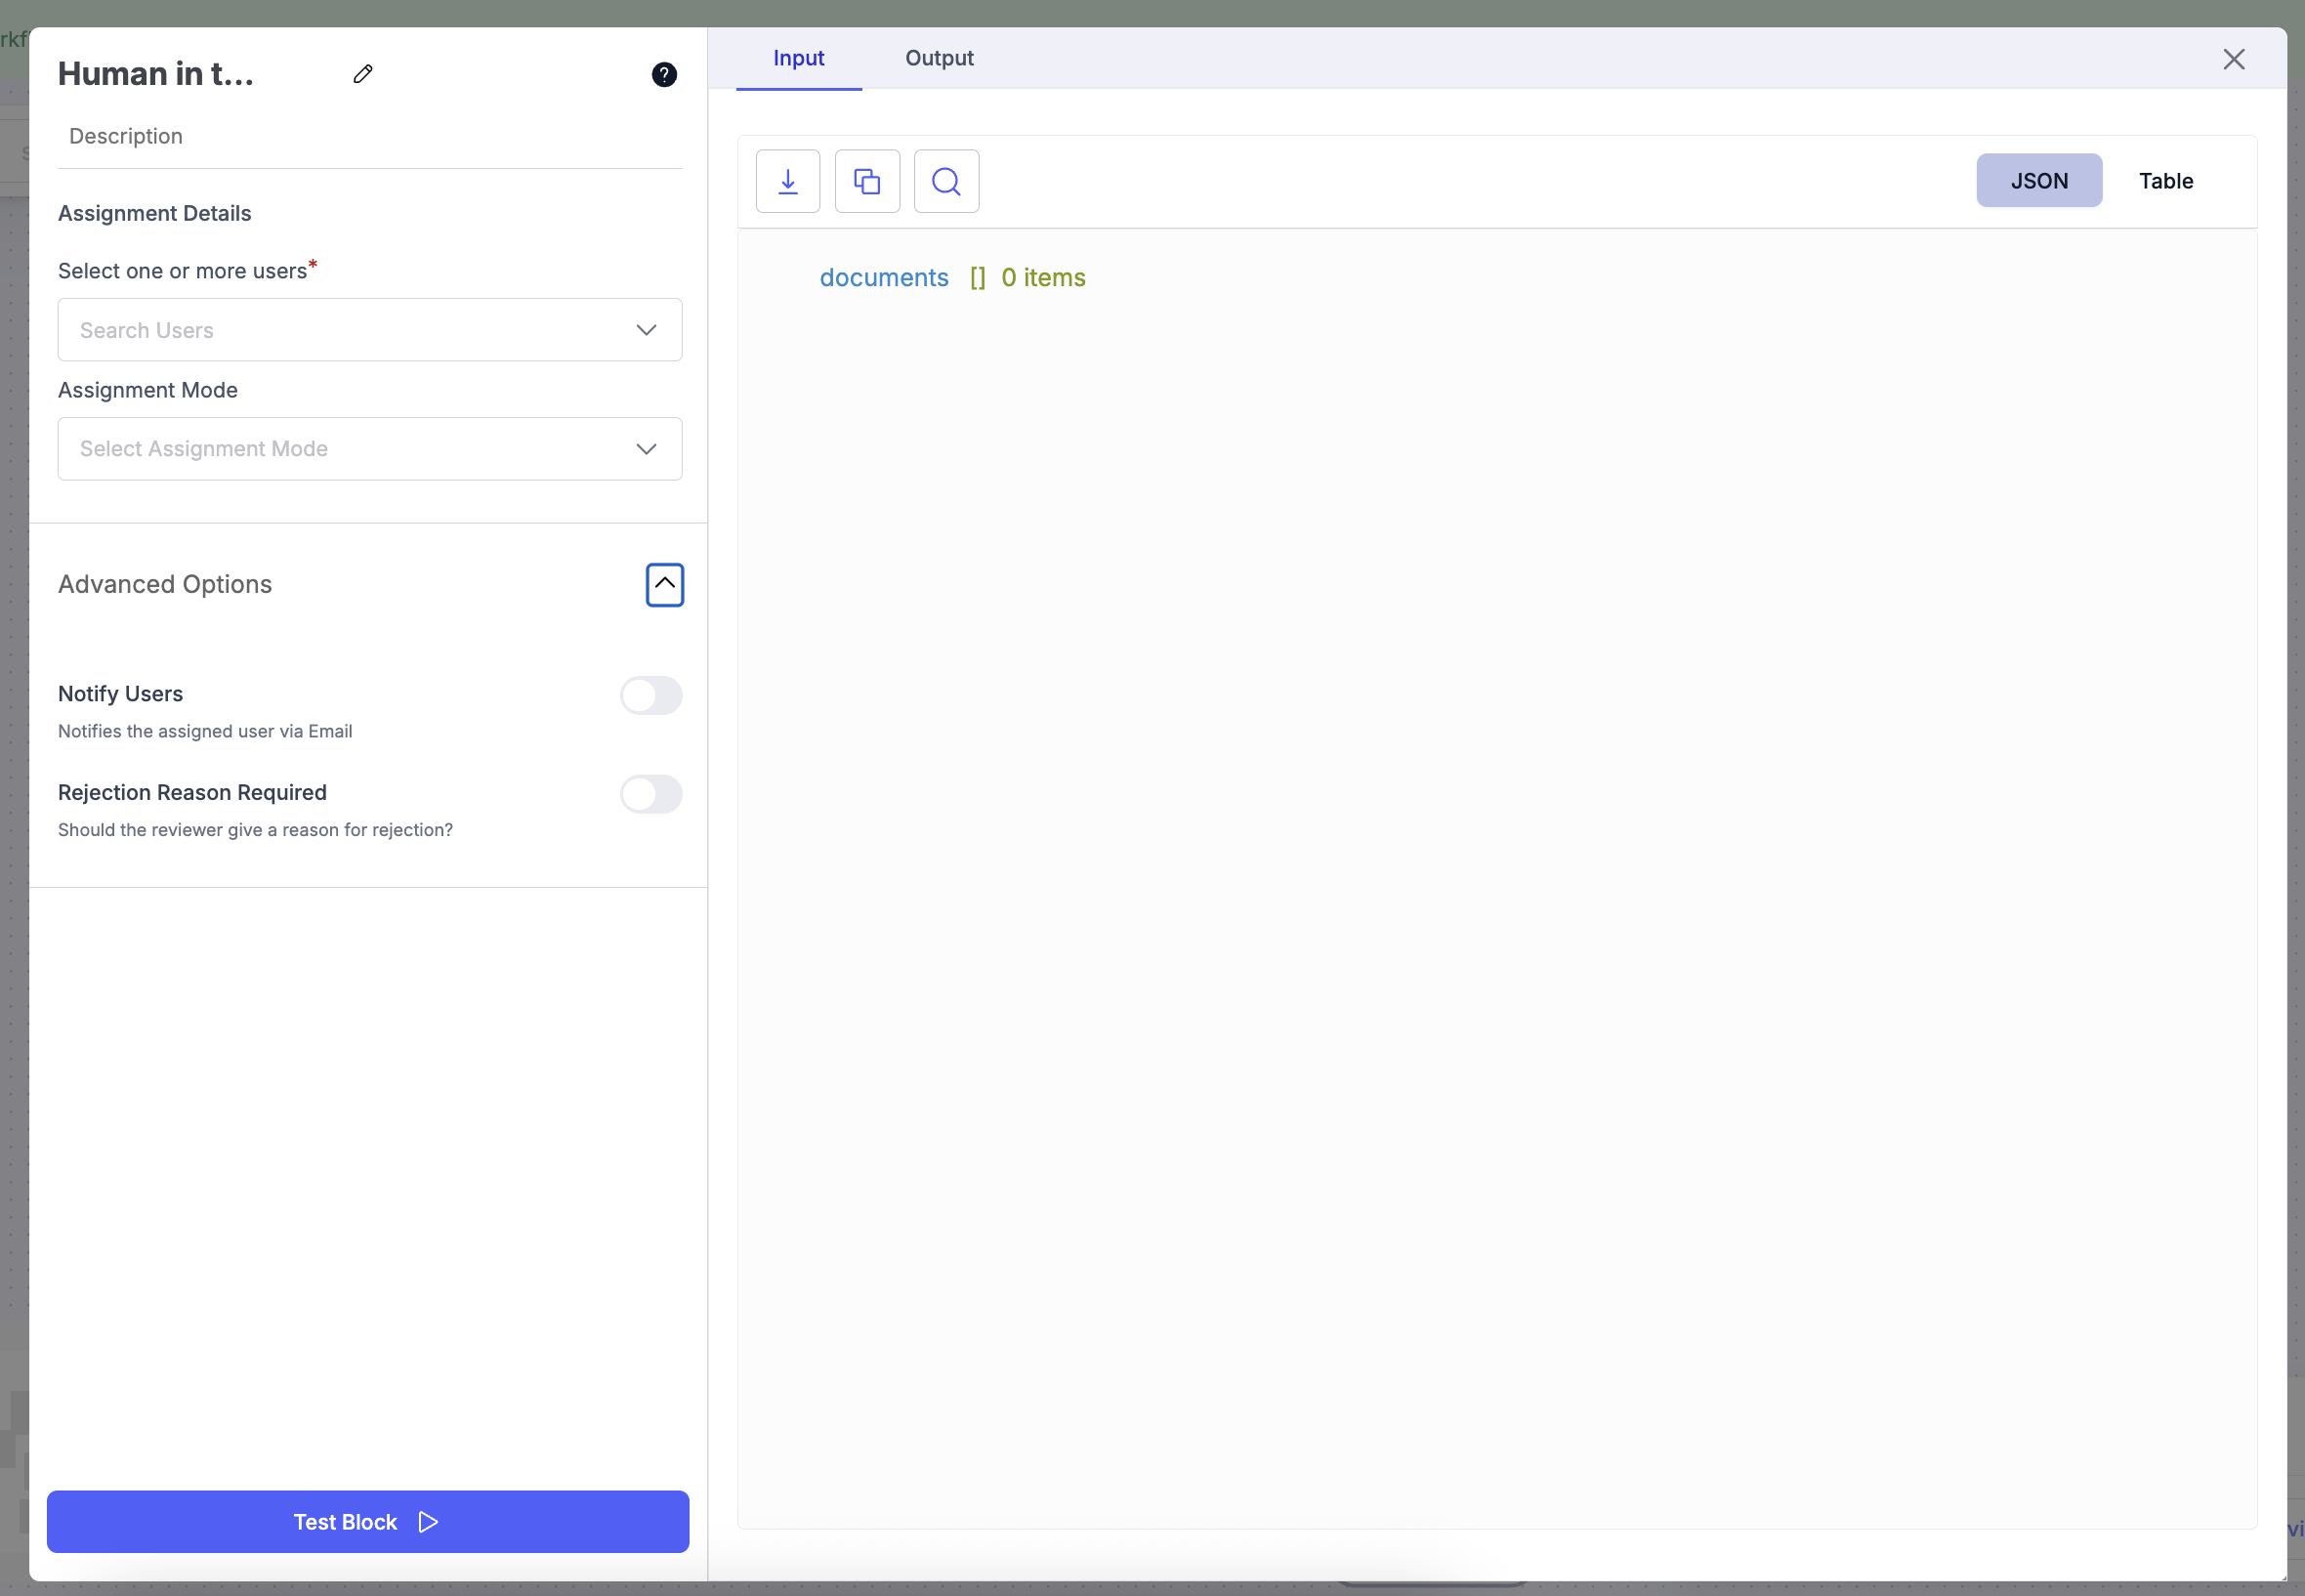
Example Use Case (SMB Lending):
After documents are automatically classified and extracted, send records with low confidence scores to a credit analyst for manual review.
| Document Type | Confidence | Routed To |
|---|---|---|
| Bank Statement | 0.92 | Auto-Approved |
| Pay Slip | 0.61 | Human Review (Credit Analyst) |
| ITR Form | 0.55 | Human Review (Credit Analyst) |
External API Block
External API Block allows you to send extracted data to external systems and use the API response to enrich or transform your workflow output.
Configuration steps
- Open the Block Library → Transform.
- Click Add External API.
- Configure the API request:
- Select Request Method (GET / POST / PUT).
- Enter the Endpoint URL.
- Add required Headers (Authorization, Content-Type, etc.).
- Define the Request Body by mapping extracted fields or using the full JSON payload.
- Configure Output Mapping:
- Map response fields to existing blocks or new blocks further down the workflow.
- Save the configuration and apply the block to your workflow.
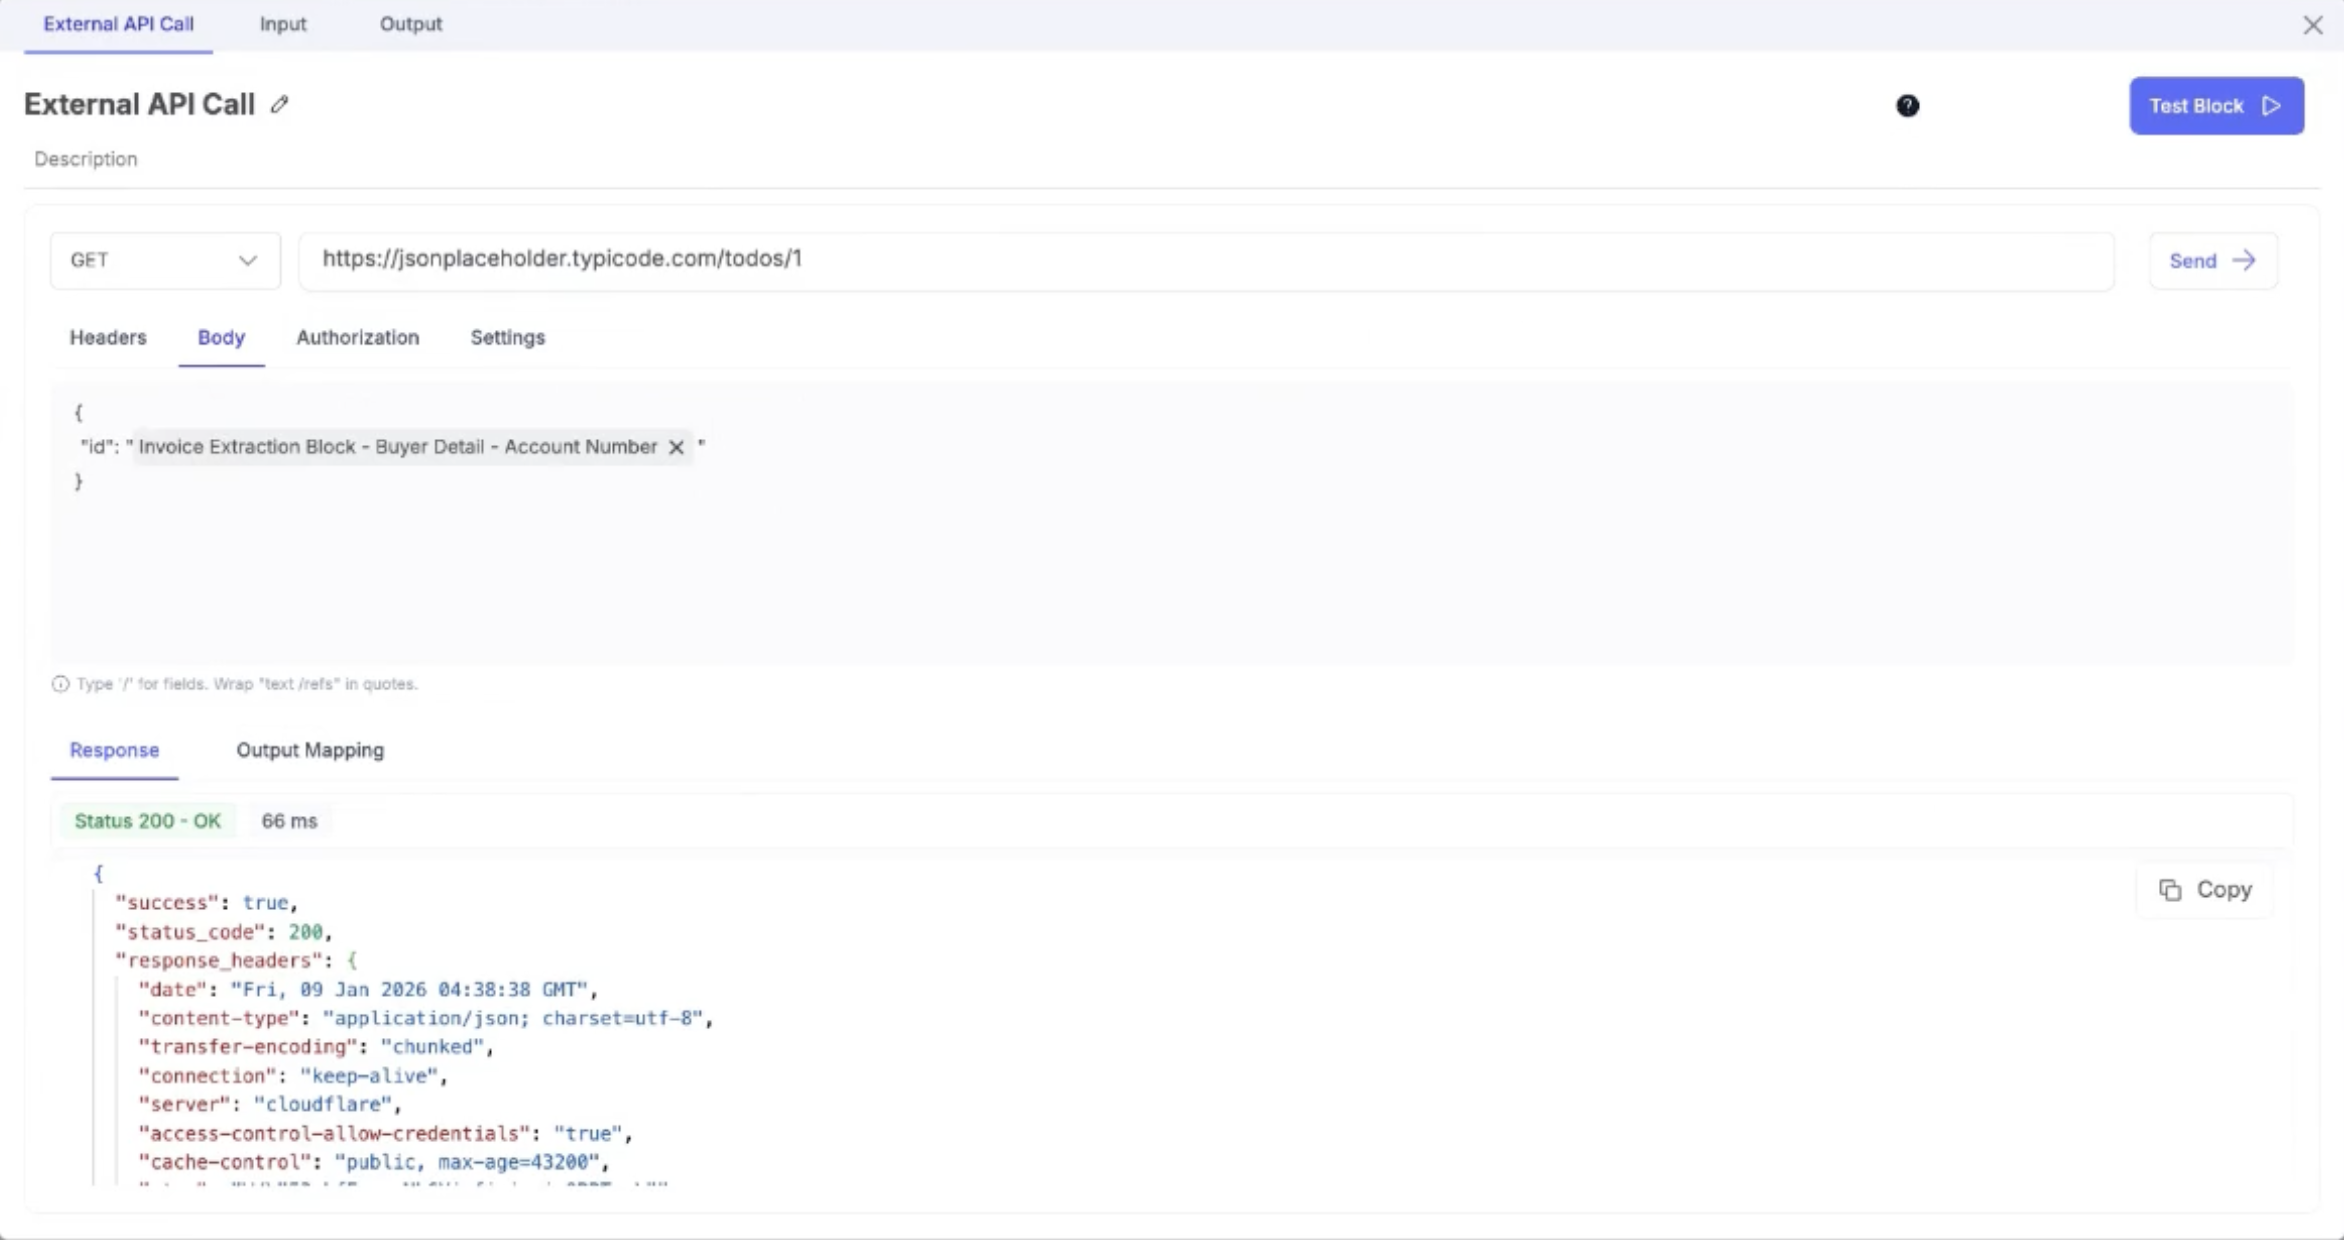
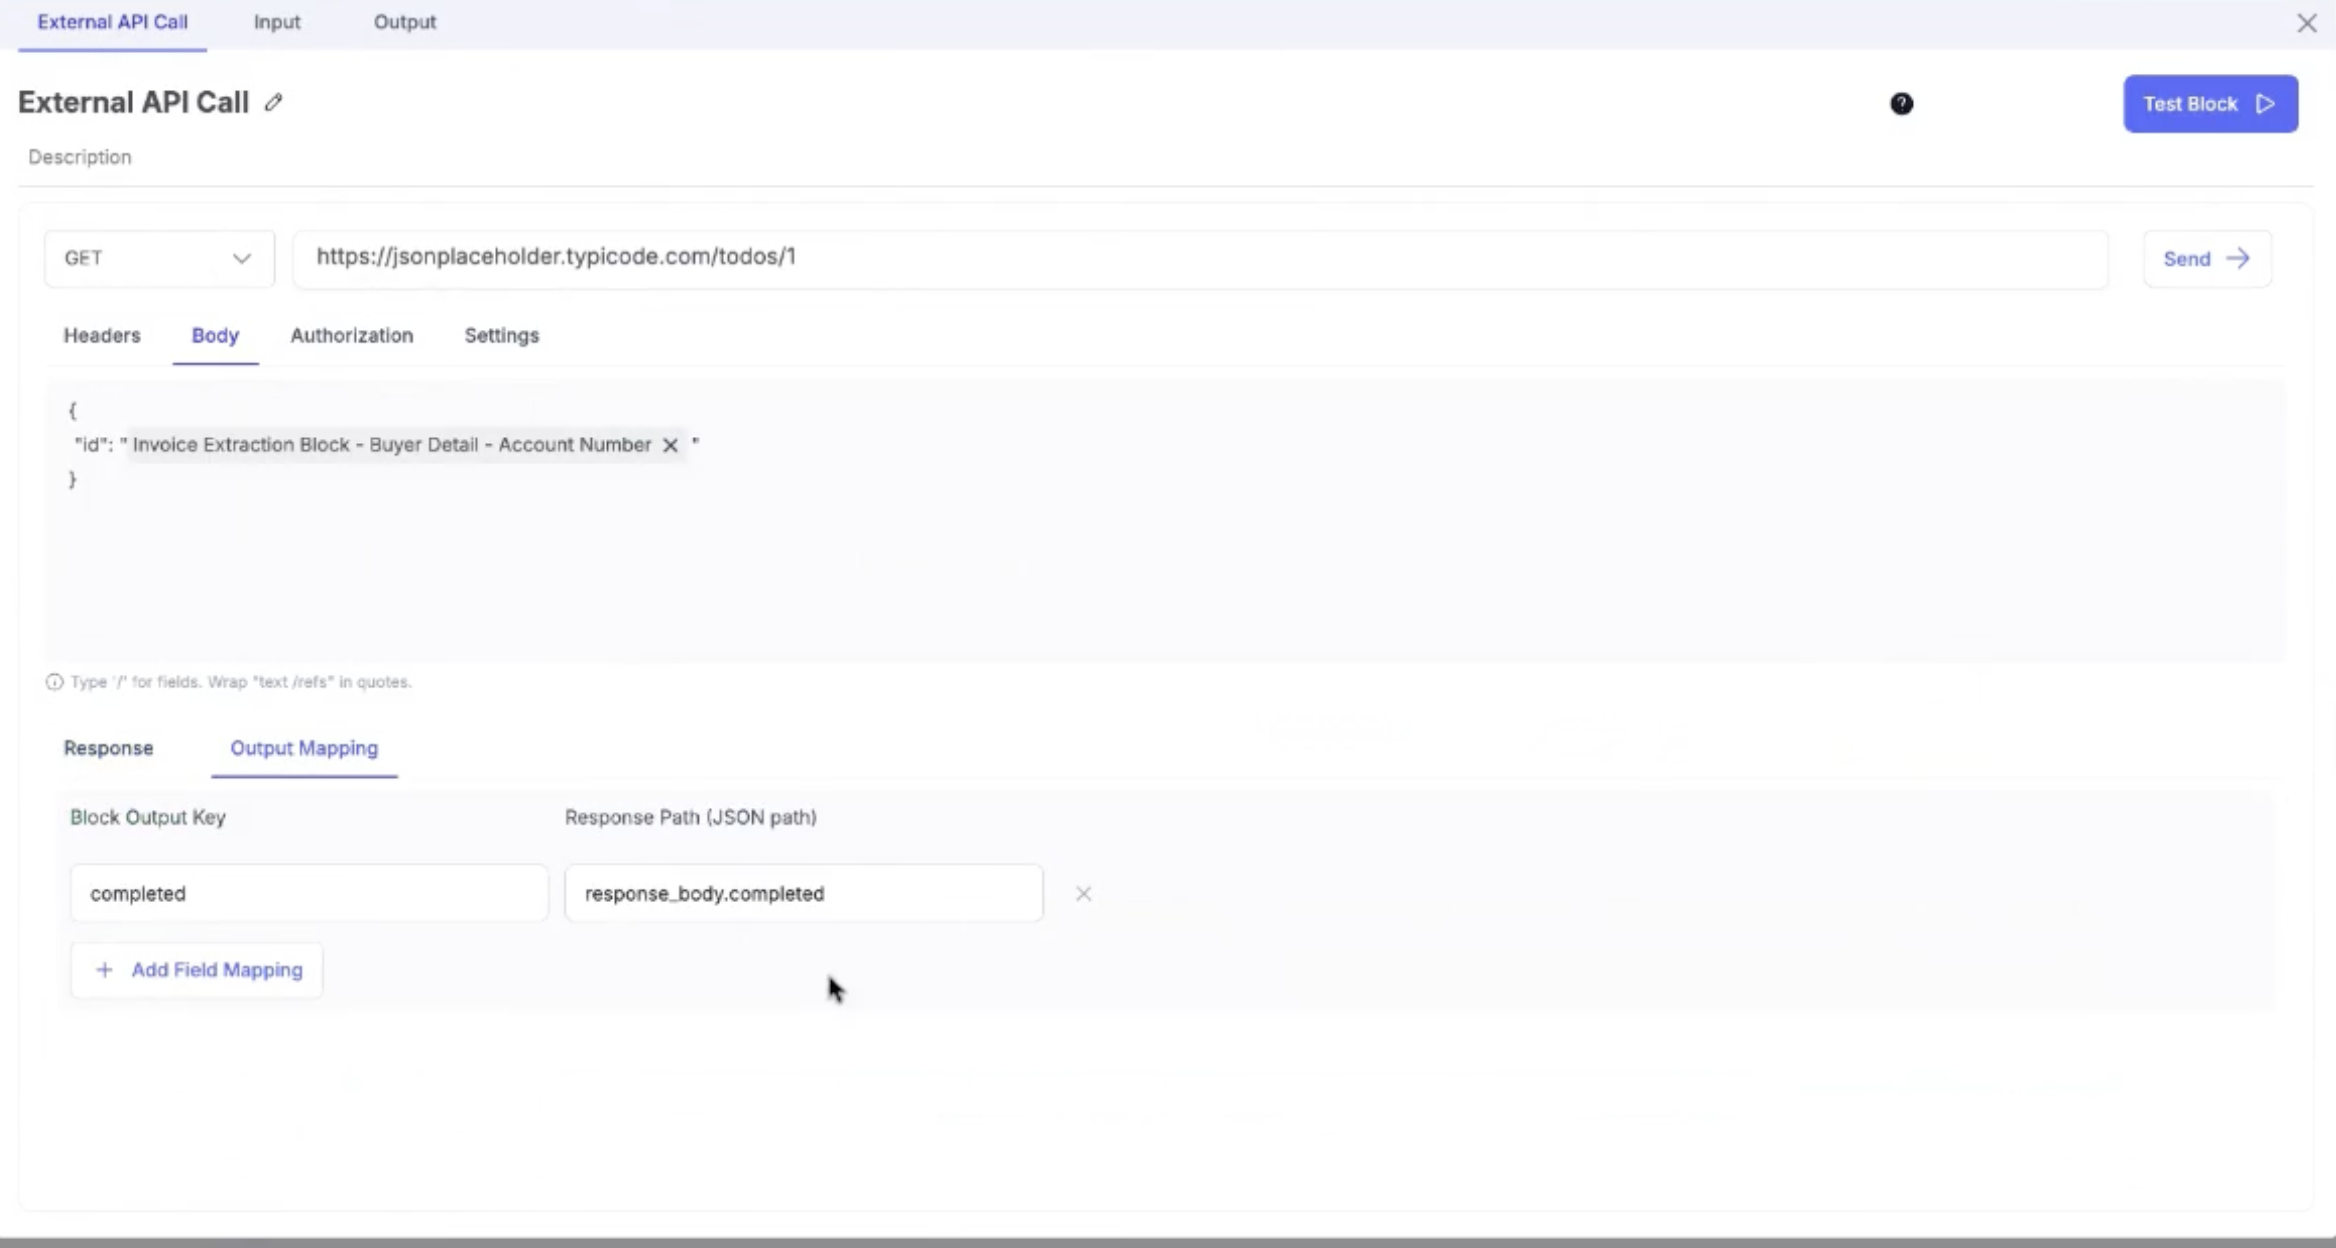
Note: You can also add secret keys or variables inside docsumo reuse in this block
Example Use Case
Send extracted invoice or case data (such as Vendor Name, GSTIN, Amount) to an external validation or enrichment API. Use the response to:
- Validate vendor or customer details
- Perform compliance or fraud checks
- Enrich extracted fields with additional metadata
- Update workflow outputs with approval status or remarks
This enables real-time integrations directly within Docsumo workflows, eliminating the need for external post-processing.
Router Block
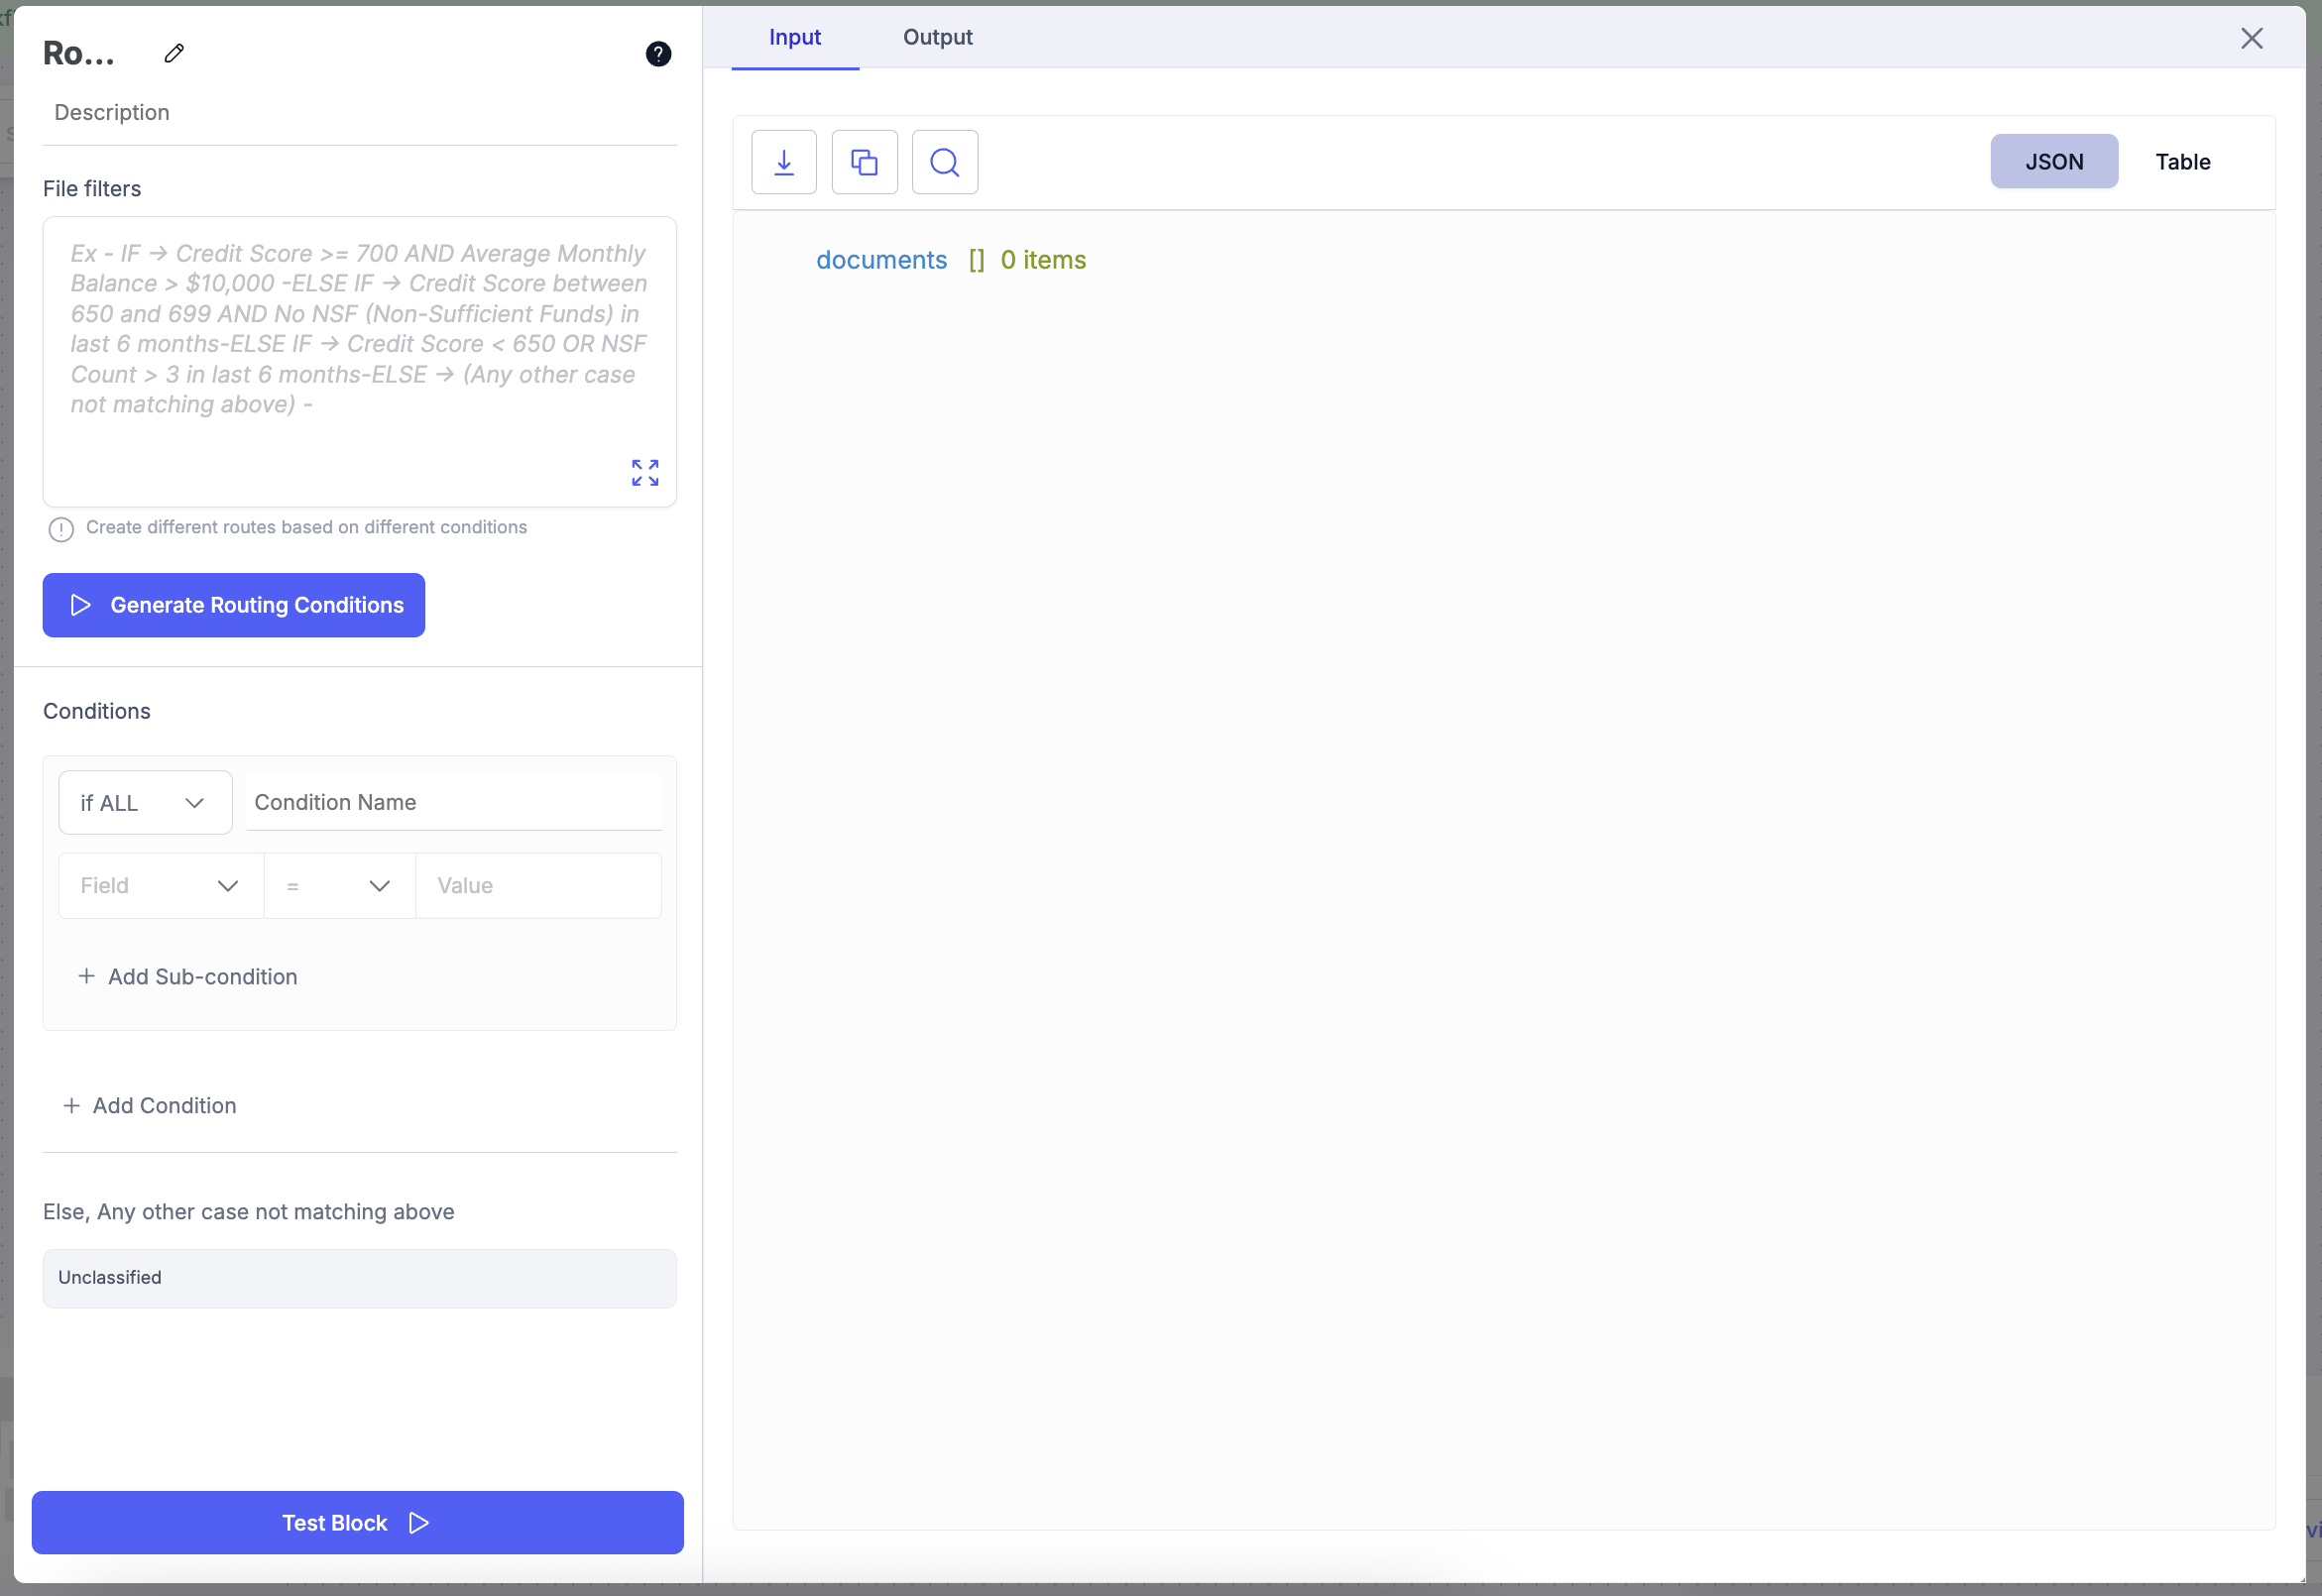
Configuration Steps
-
Define Routing Logic
- In the File Filters section, describe the logic for how documents should be routed.
- Example:
IF → Credit Score >= 700 AND Average Monthly Balance > $10,000
ELSE IF → Credit Score between 650 and 699 AND No NSF (Non-Sufficient Funds) in last 6 months
ELSE IF → Credit Score < 650 OR NSF Count > 3 in last 6 months
ELSE → Any other case not matching above
-
Generate Routing Conditions
- Click Generate Routing Conditions to automatically create routes for each logic branch.
- Each route can lead to a different step (e.g., verification, AI categorization, or human review).
-
Set Condition Rules: Use logical operators to define rules precisely:
- ALL → all sub-conditions must be true.
- ANY → at least one sub-condition must be true.
-
Else Condition Handles any document that doesn’t meet the specified routing criteria.
- Default value is Unclassified, but you can rename it.
-
Test Block: Click Test Block to preview routing results using sample data.
Example Use Case: SMB Loan Application Routing
| Condition | Rule | Route |
|---|---|---|
| Premium Borrower | Credit Score ≥ 750 AND Balance ≥ ₹5L | Route to Fast Track Loan Flow |
| Standard Borrower | Credit Score between 650–749 | Route to Regular Loan Review |
| High Risk Borrower | Credit Score < 650 OR NSF > 3 | Route to Human in the Loop Block |
| Else | No match | Unclassified |
Validation Block
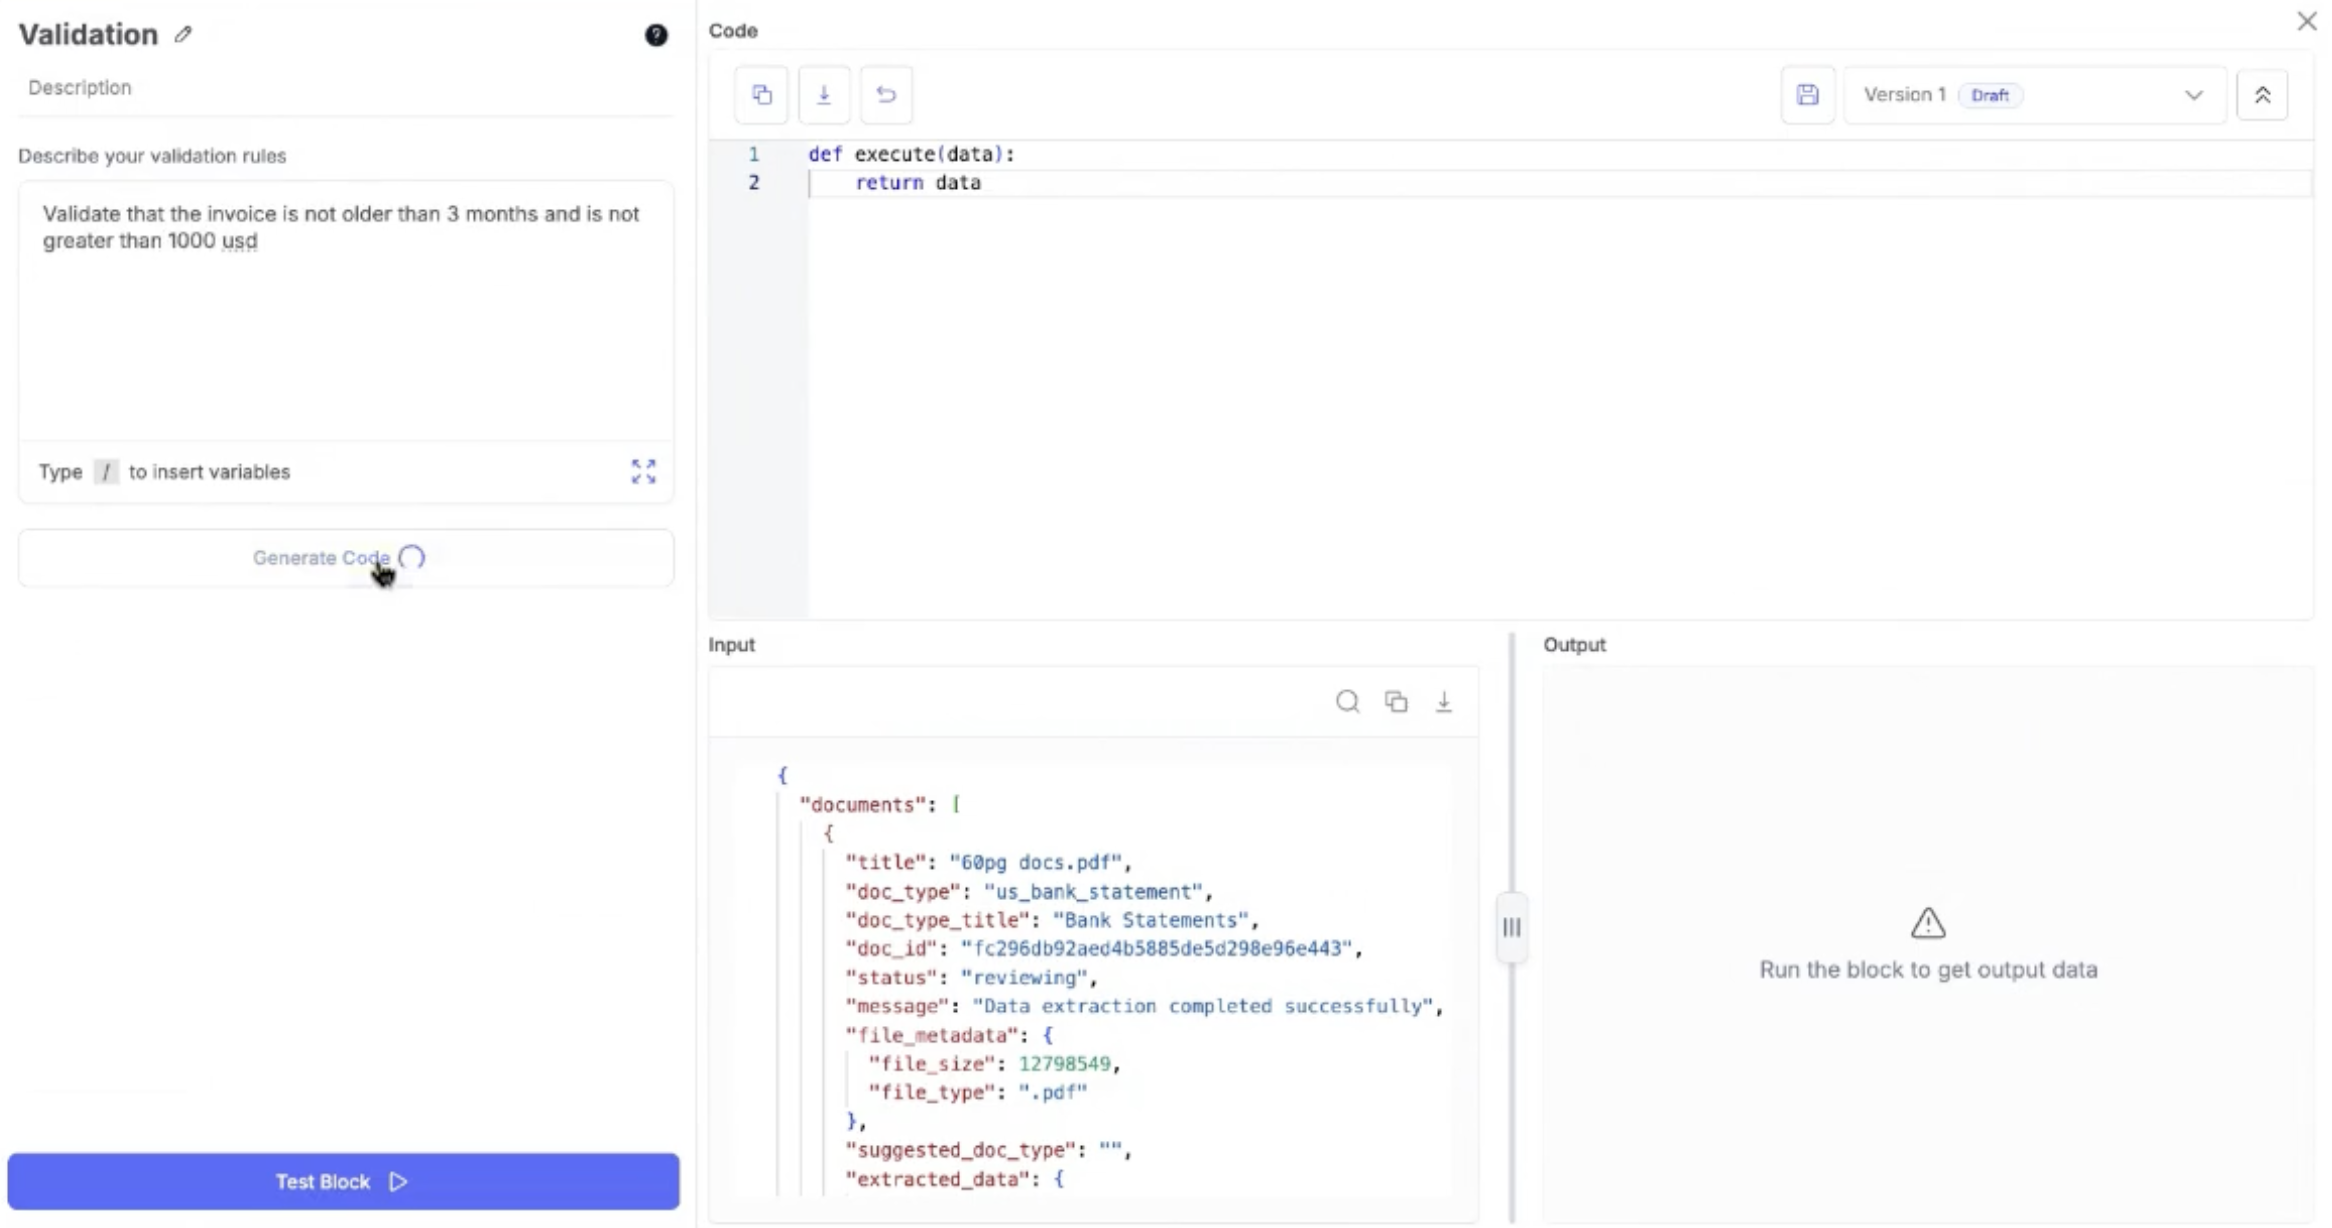
Validation Block allows you to define custom validations for your workflow automation using an input prompt. These validations help verify extracted and transformed data during workflow execution, ensuring accuracy and completeness.
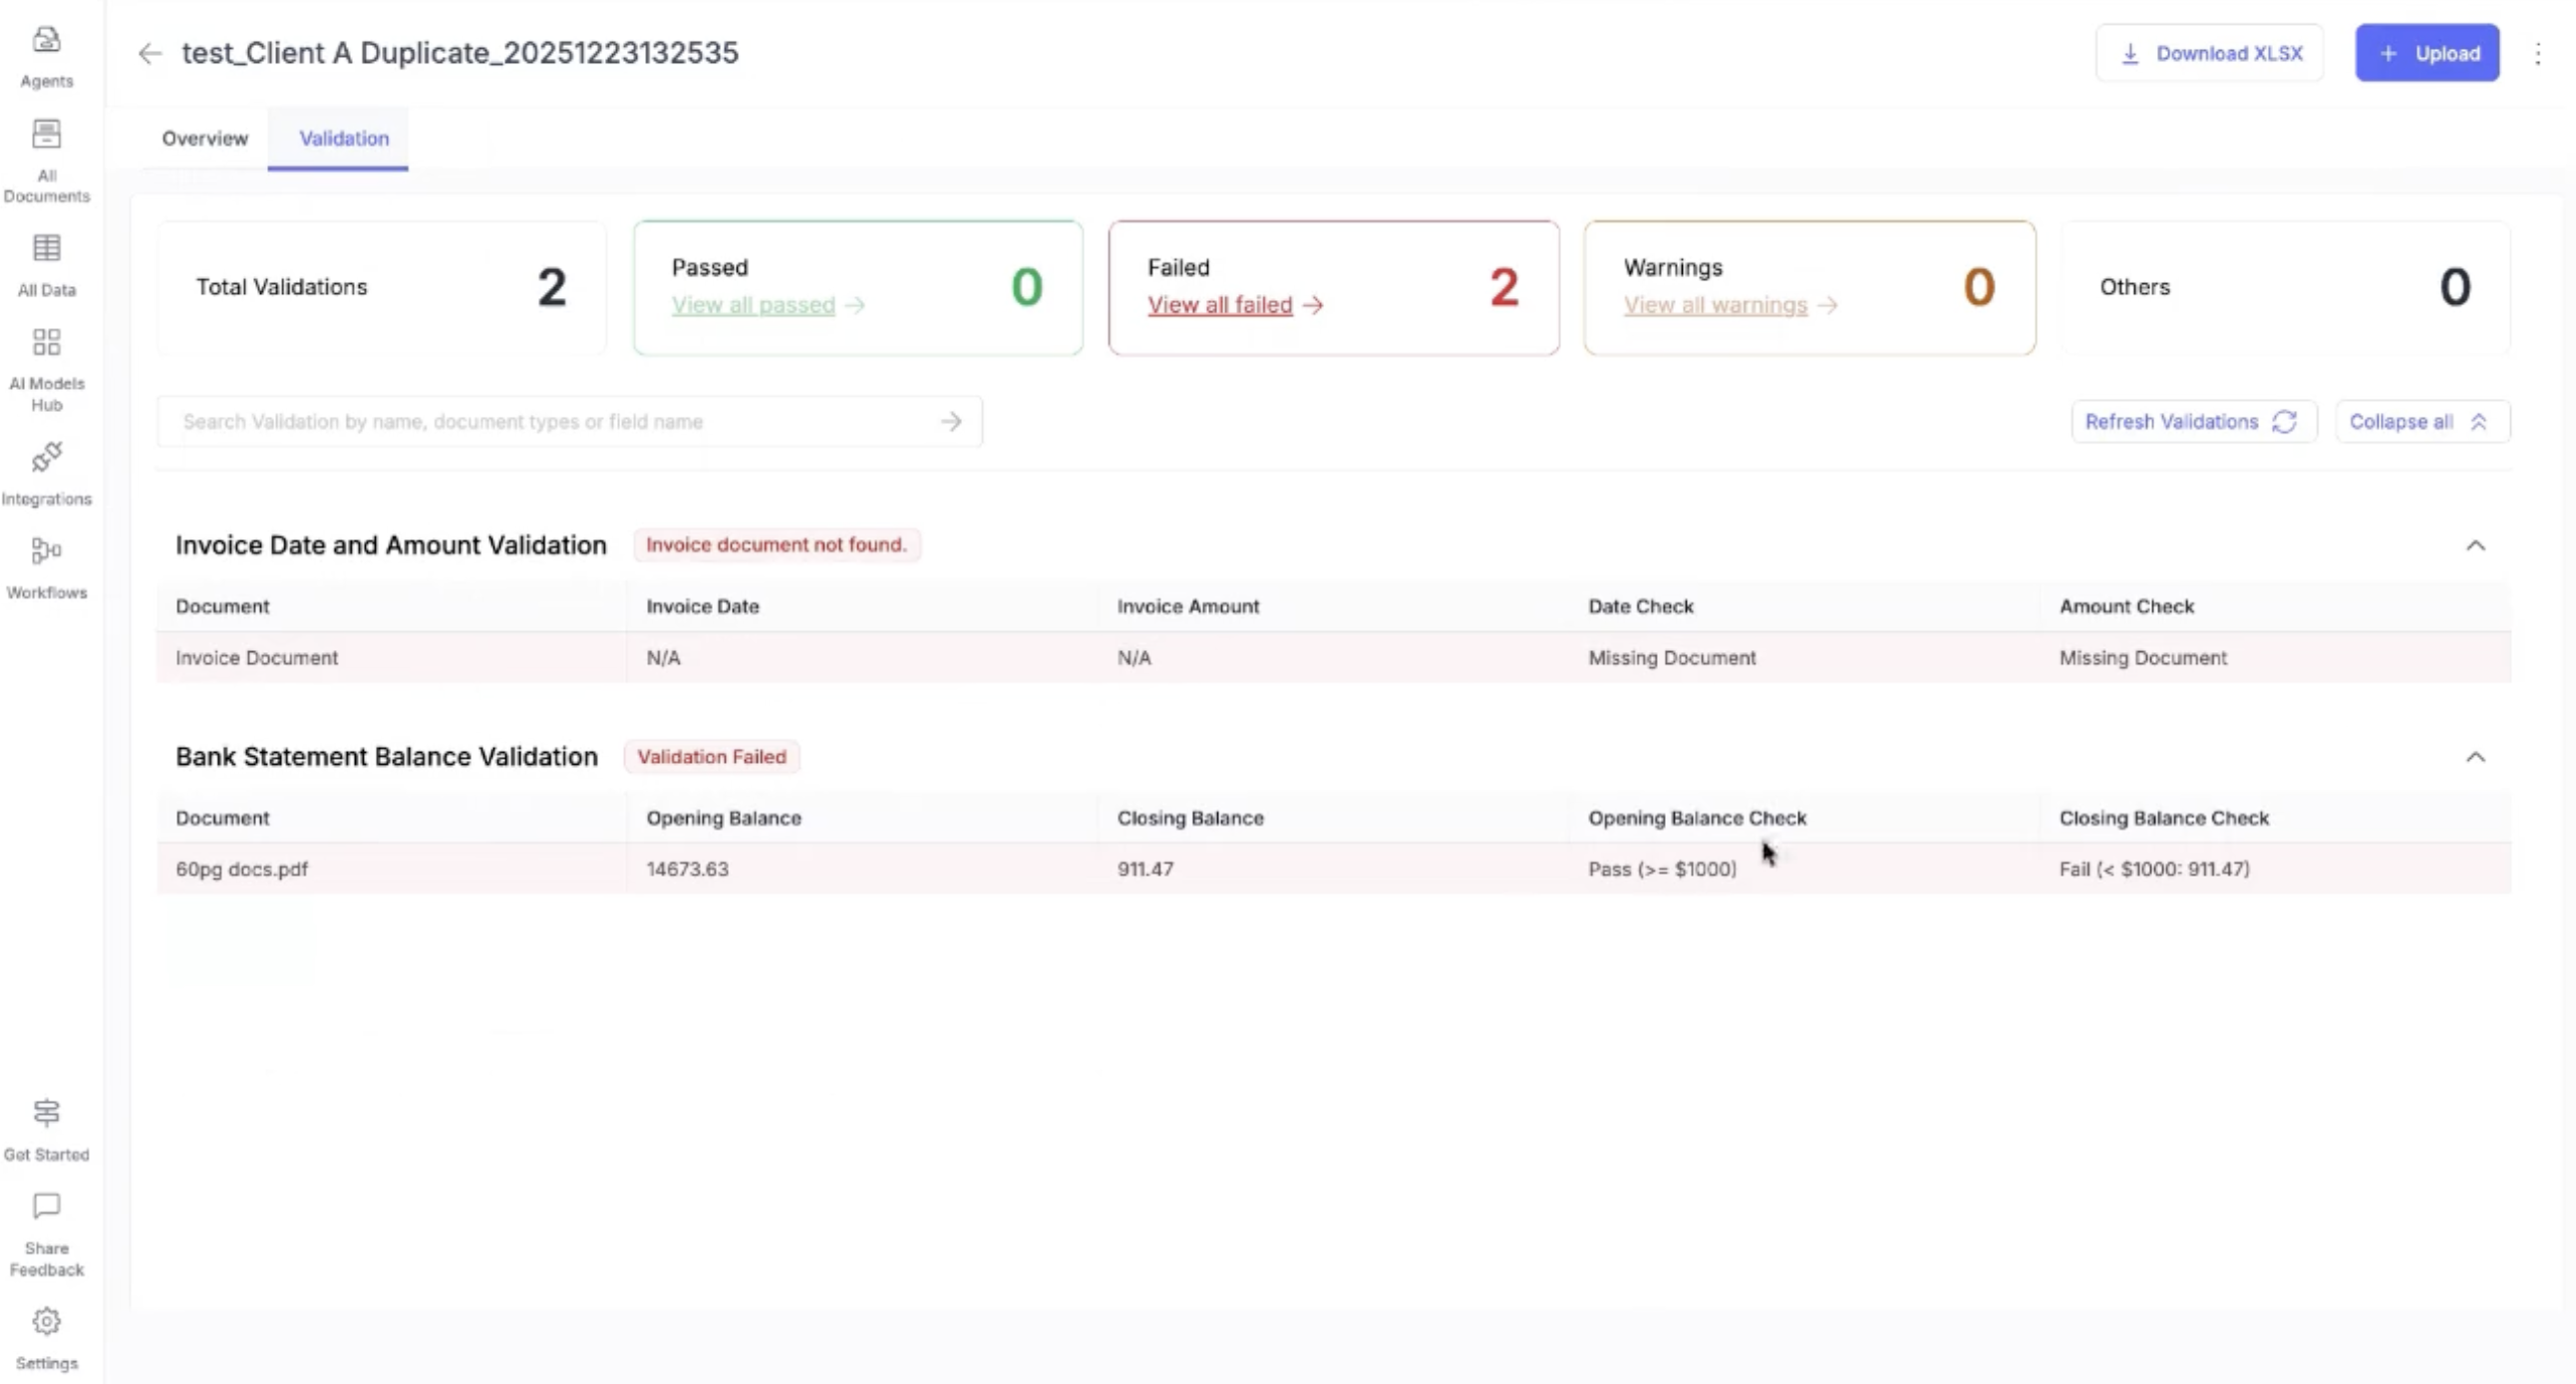
Once configured, all validation rules are executed automatically, and results are visible in the Case Overview → Validation tab. The block is available on case workflows; a workflow without a case has no Validation tab to show results in.
Configuration Steps
- Select Validation Block.
- Enter an Input Prompt describing the validations you want to apply (for example, required fields, value ranges, cross-field checks, or business rules).
- Configure any additional parameters as needed for your validation logic.
- Save the configuration and apply the block to your workflow.
Example Use Case
Use Validation Block to:
- Ensure mandatory fields like Invoice Number or Total Amount are present
- Validate amounts against line-item totals
- Check date formats or value ranges
- Apply custom business rules across documents in a case
After workflow execution, users can review validation results directly in the Case Overview → Validation tab, making it easy to identify issues and take corrective action.
Case Update Block
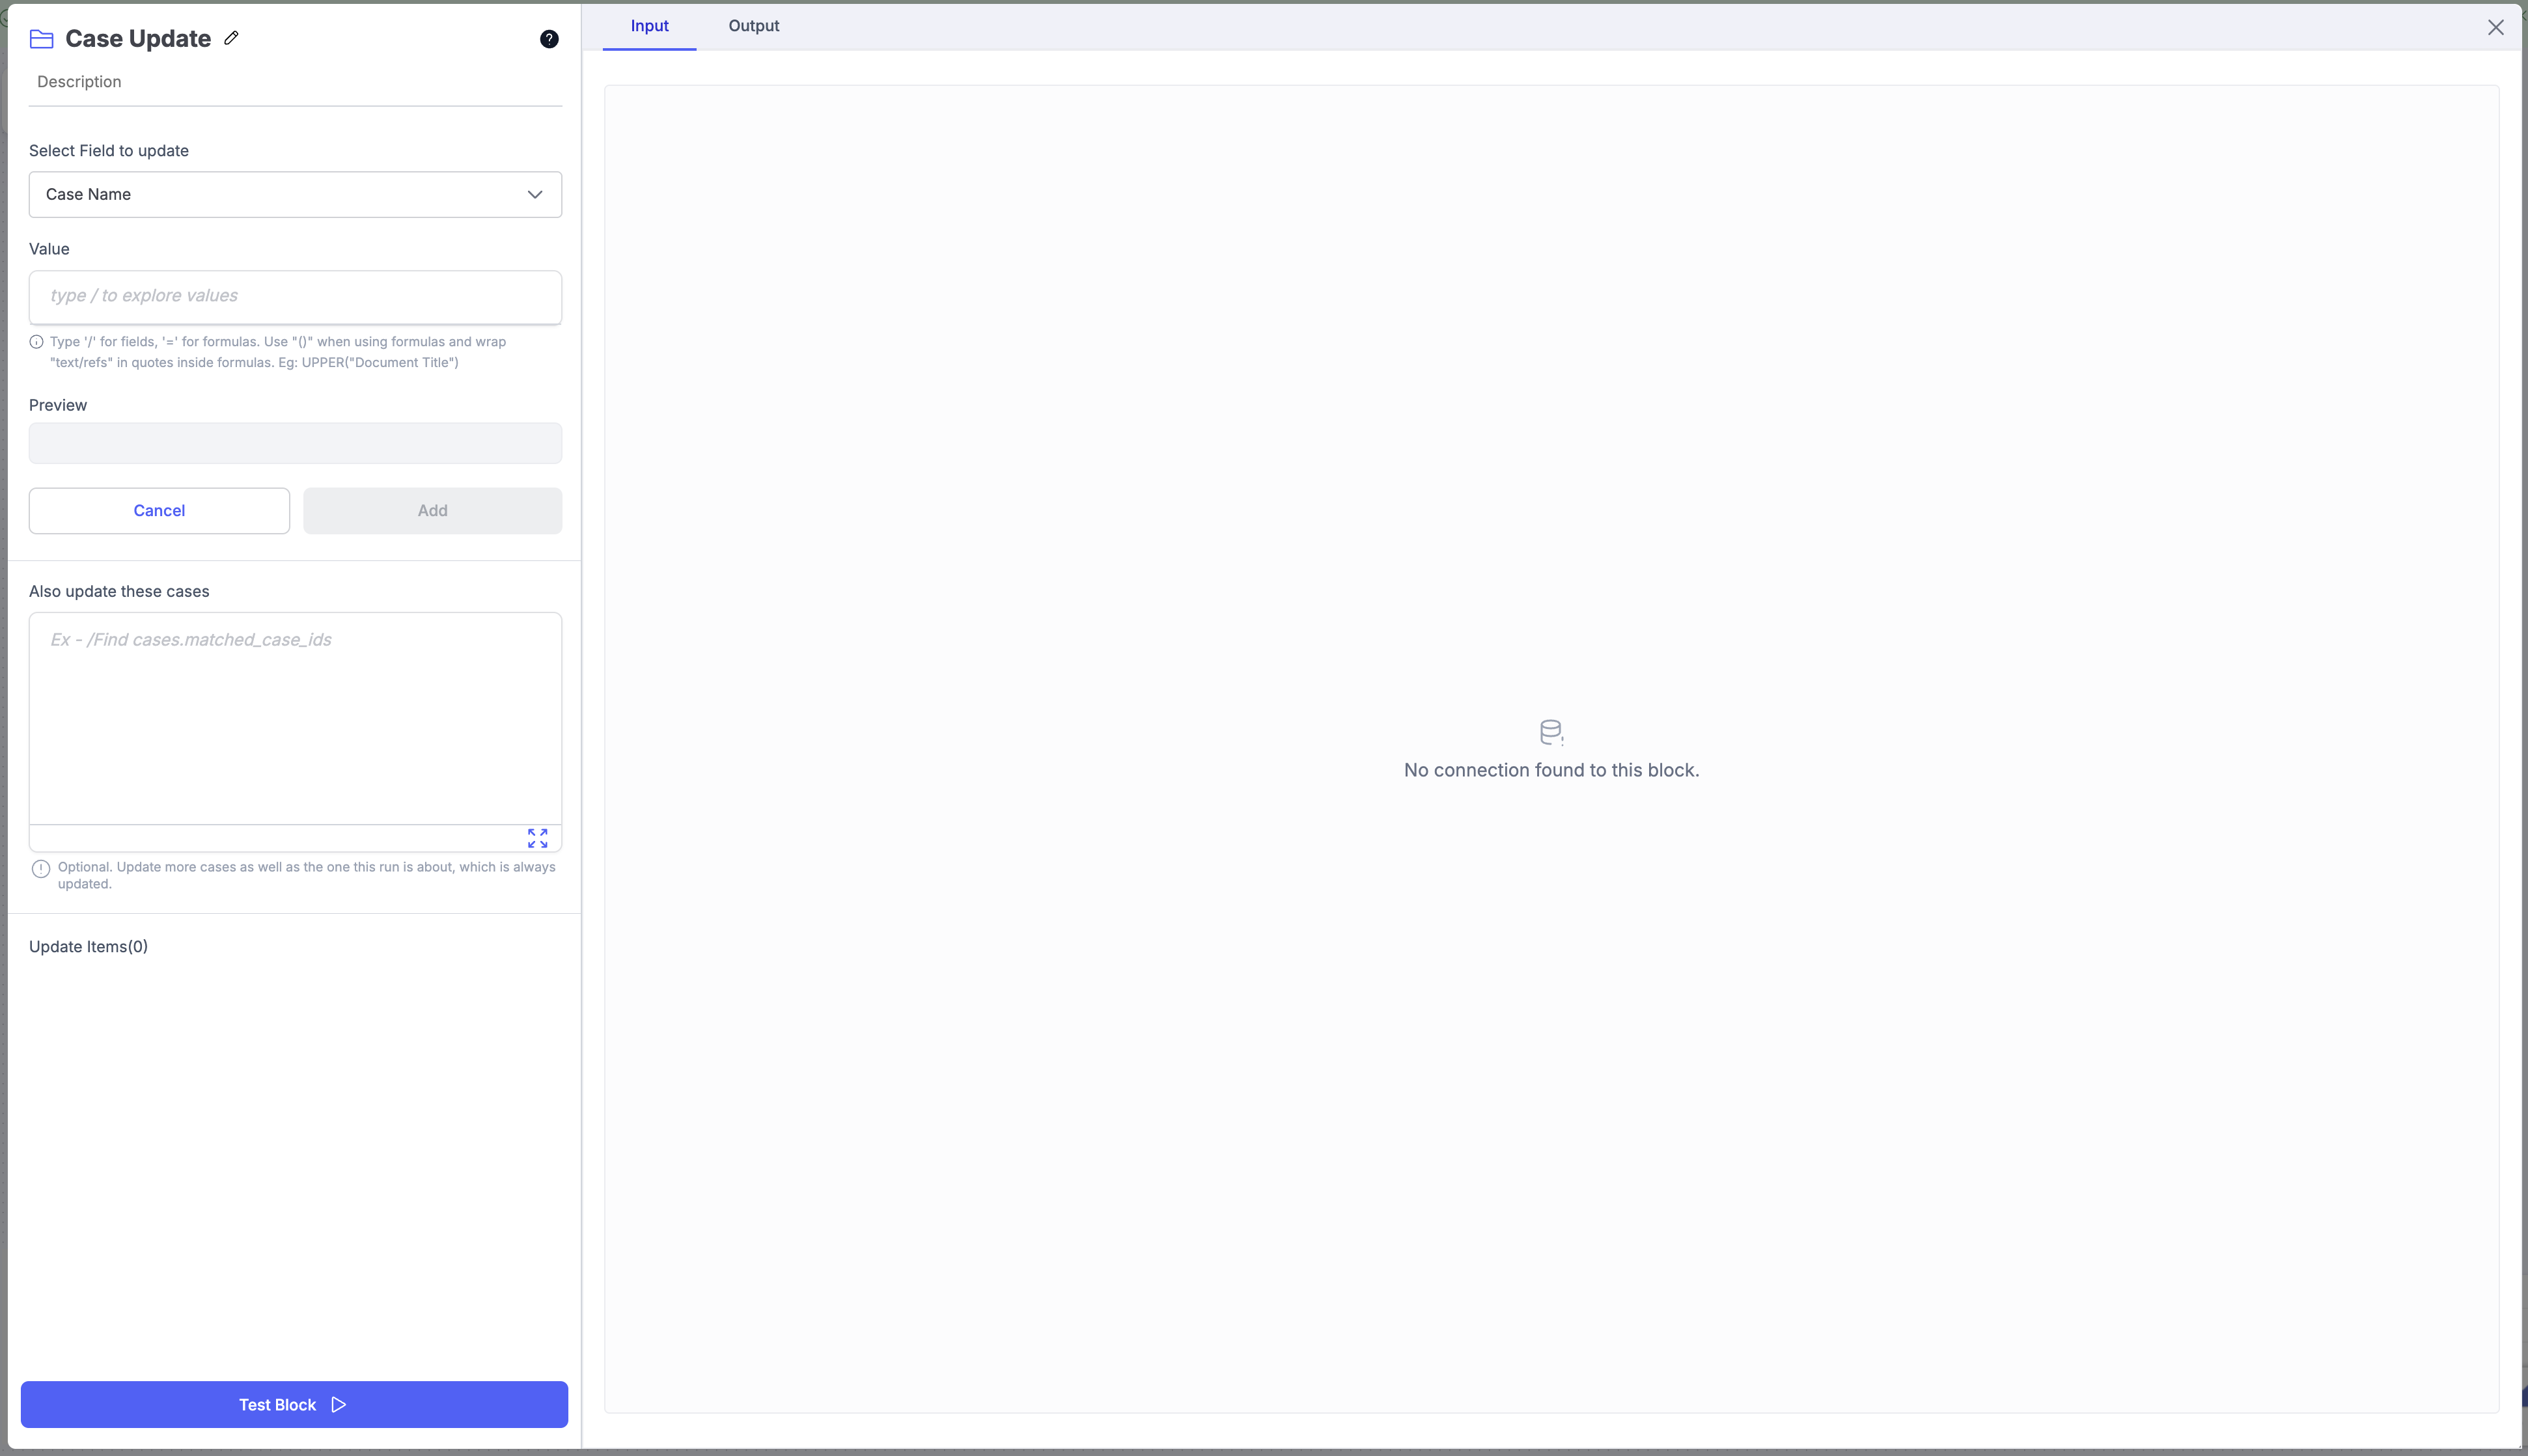
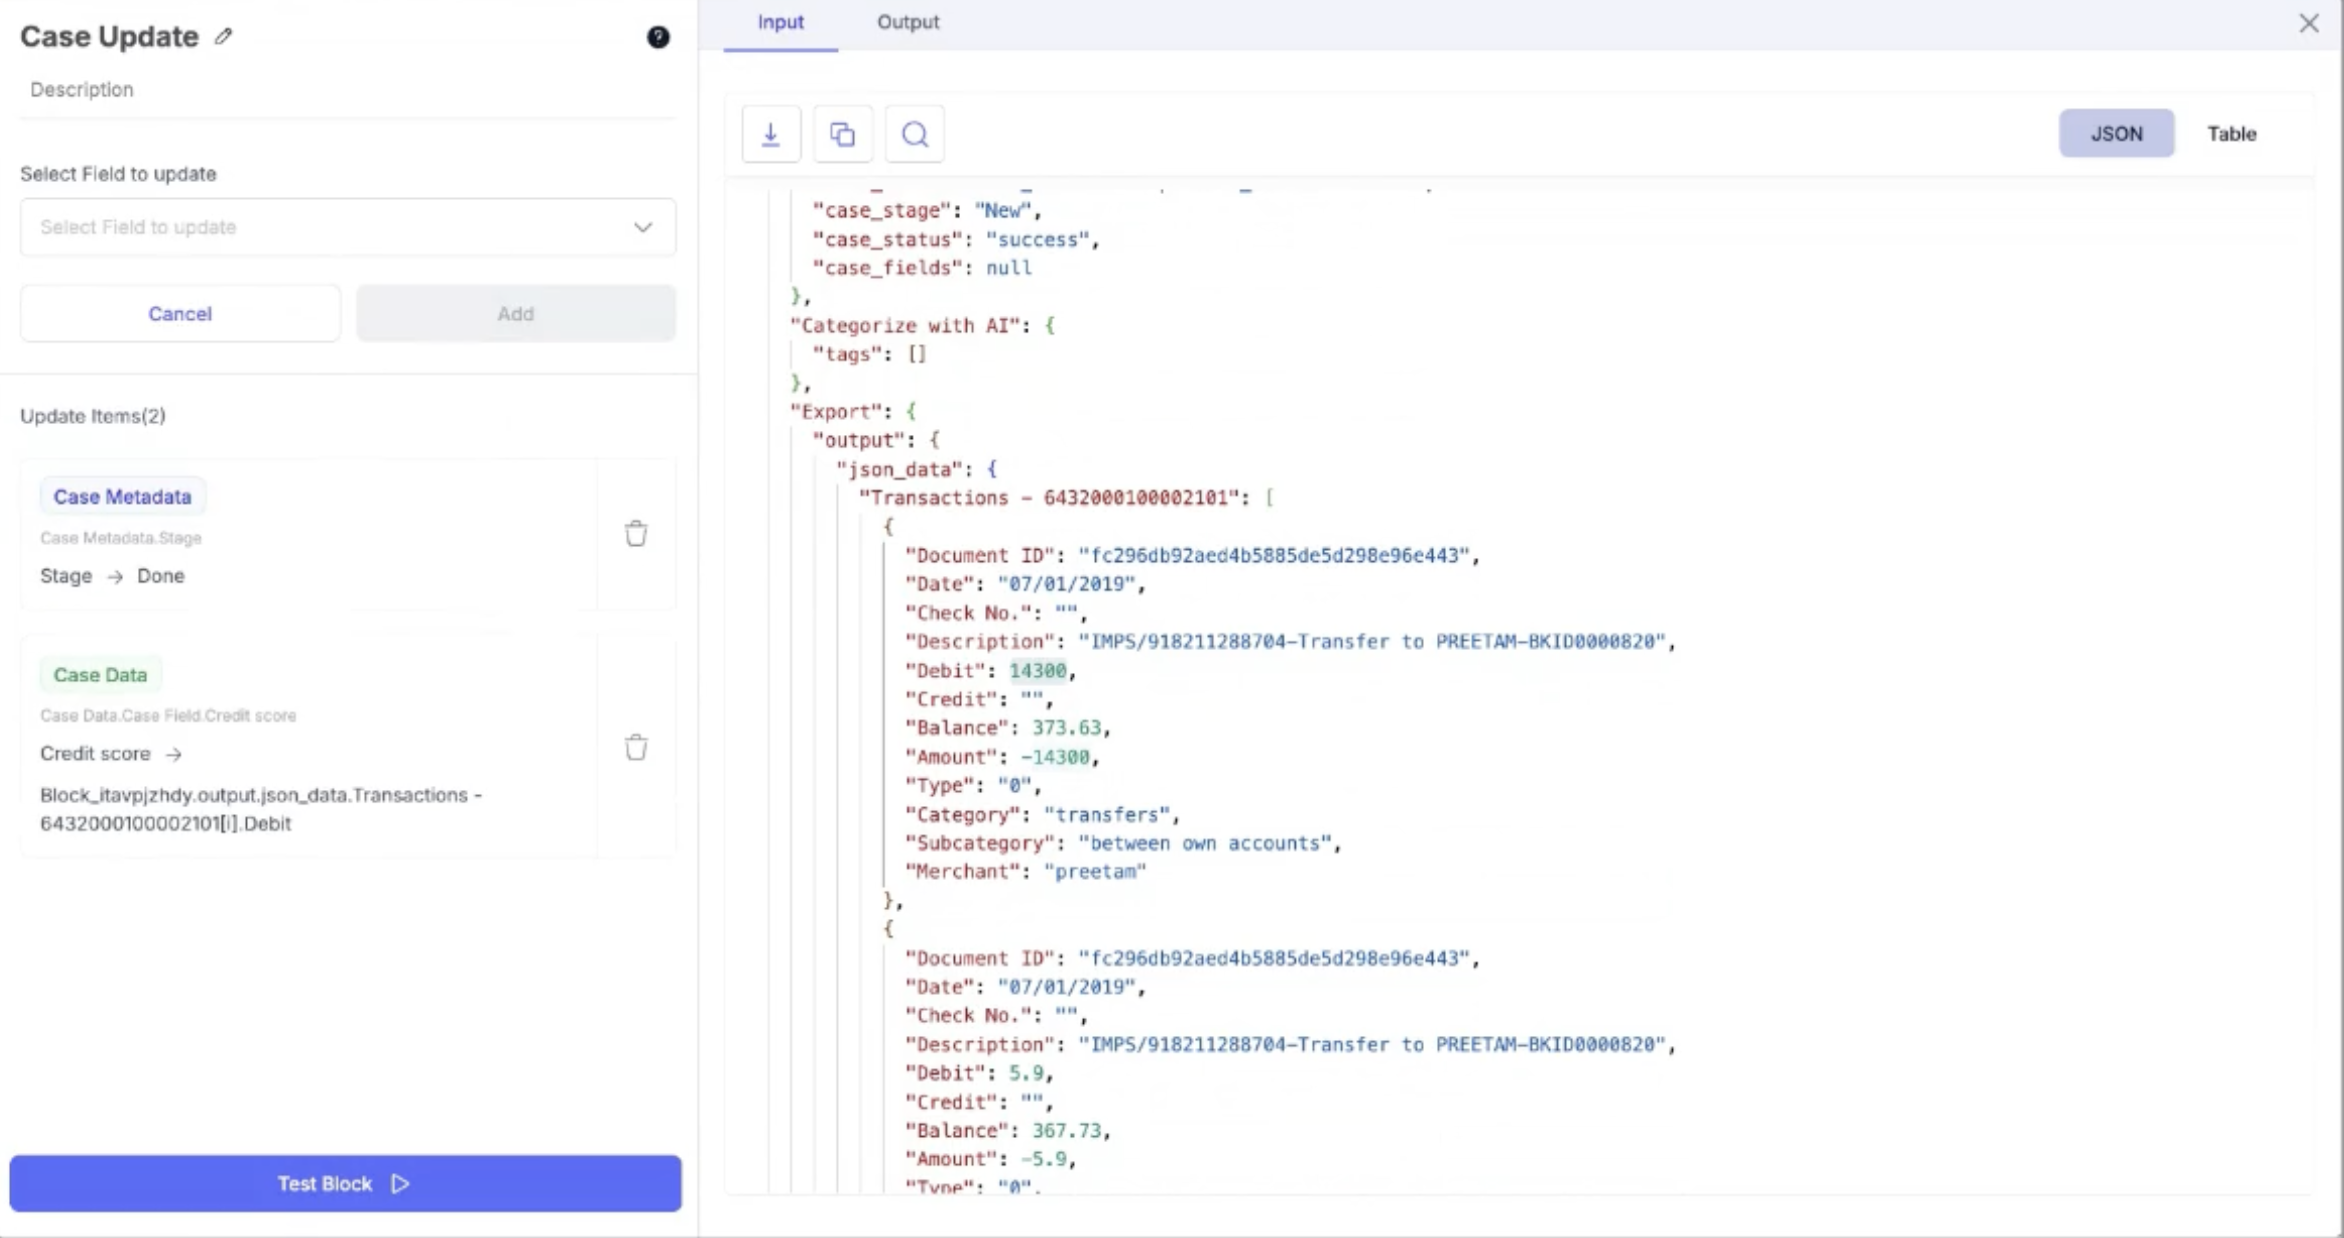
Case Update writes to cases: their stage, status, assignee, case fields and, on a case workflow, document fields. The values come from earlier blocks in the workflow.
Which cases it updates depends on the kind of workflow.
| Workflow | Cases updated |
|---|---|
| Case workflow (Upload as: Case) or Case Event | The case this run is about, always. Optionally more cases under Also update these cases |
| Schedule, Manual or Upload as: Files | Only the cases you point it at under Cases to update, which is required. This run has no case of its own |
Configuration Steps
- Case type (workflows without a case only): select the case type the cases belong to. Stages and fields are read from it. Cases of another type are skipped.
- Cases to update / Also update these cases: point to an earlier block's output that holds cases, typically a Lookup's matched cases or a Case Action's cases. For example
/Find cases.matched_case_ids. One case or a list, both work. - Choose the fields to update:
- Case fields, stage, status, assignee
- Document fields (case workflows only; a run without a case has no documents to write to)
- Map each selected field to the new value generated earlier in the workflow.
- Review the mappings, save, and Test Block. The run detail lists every case the block wrote to.
Example Use Cases
On a case workflow: after External API or Export blocks, update the case's Status, Priority or metadata so the case reflects the latest data without manual edits.
On a scheduled workflow: a Lookup finds every case that moved to Approved today, an External API posts each to your ERP, and Case Update moves them to Synced.
If this workflow starts from a Case Event trigger and Case Update moves cases to a stage that trigger listens for, a run can trigger itself. The trigger panel warns you when this is the case.
Summarise with AI
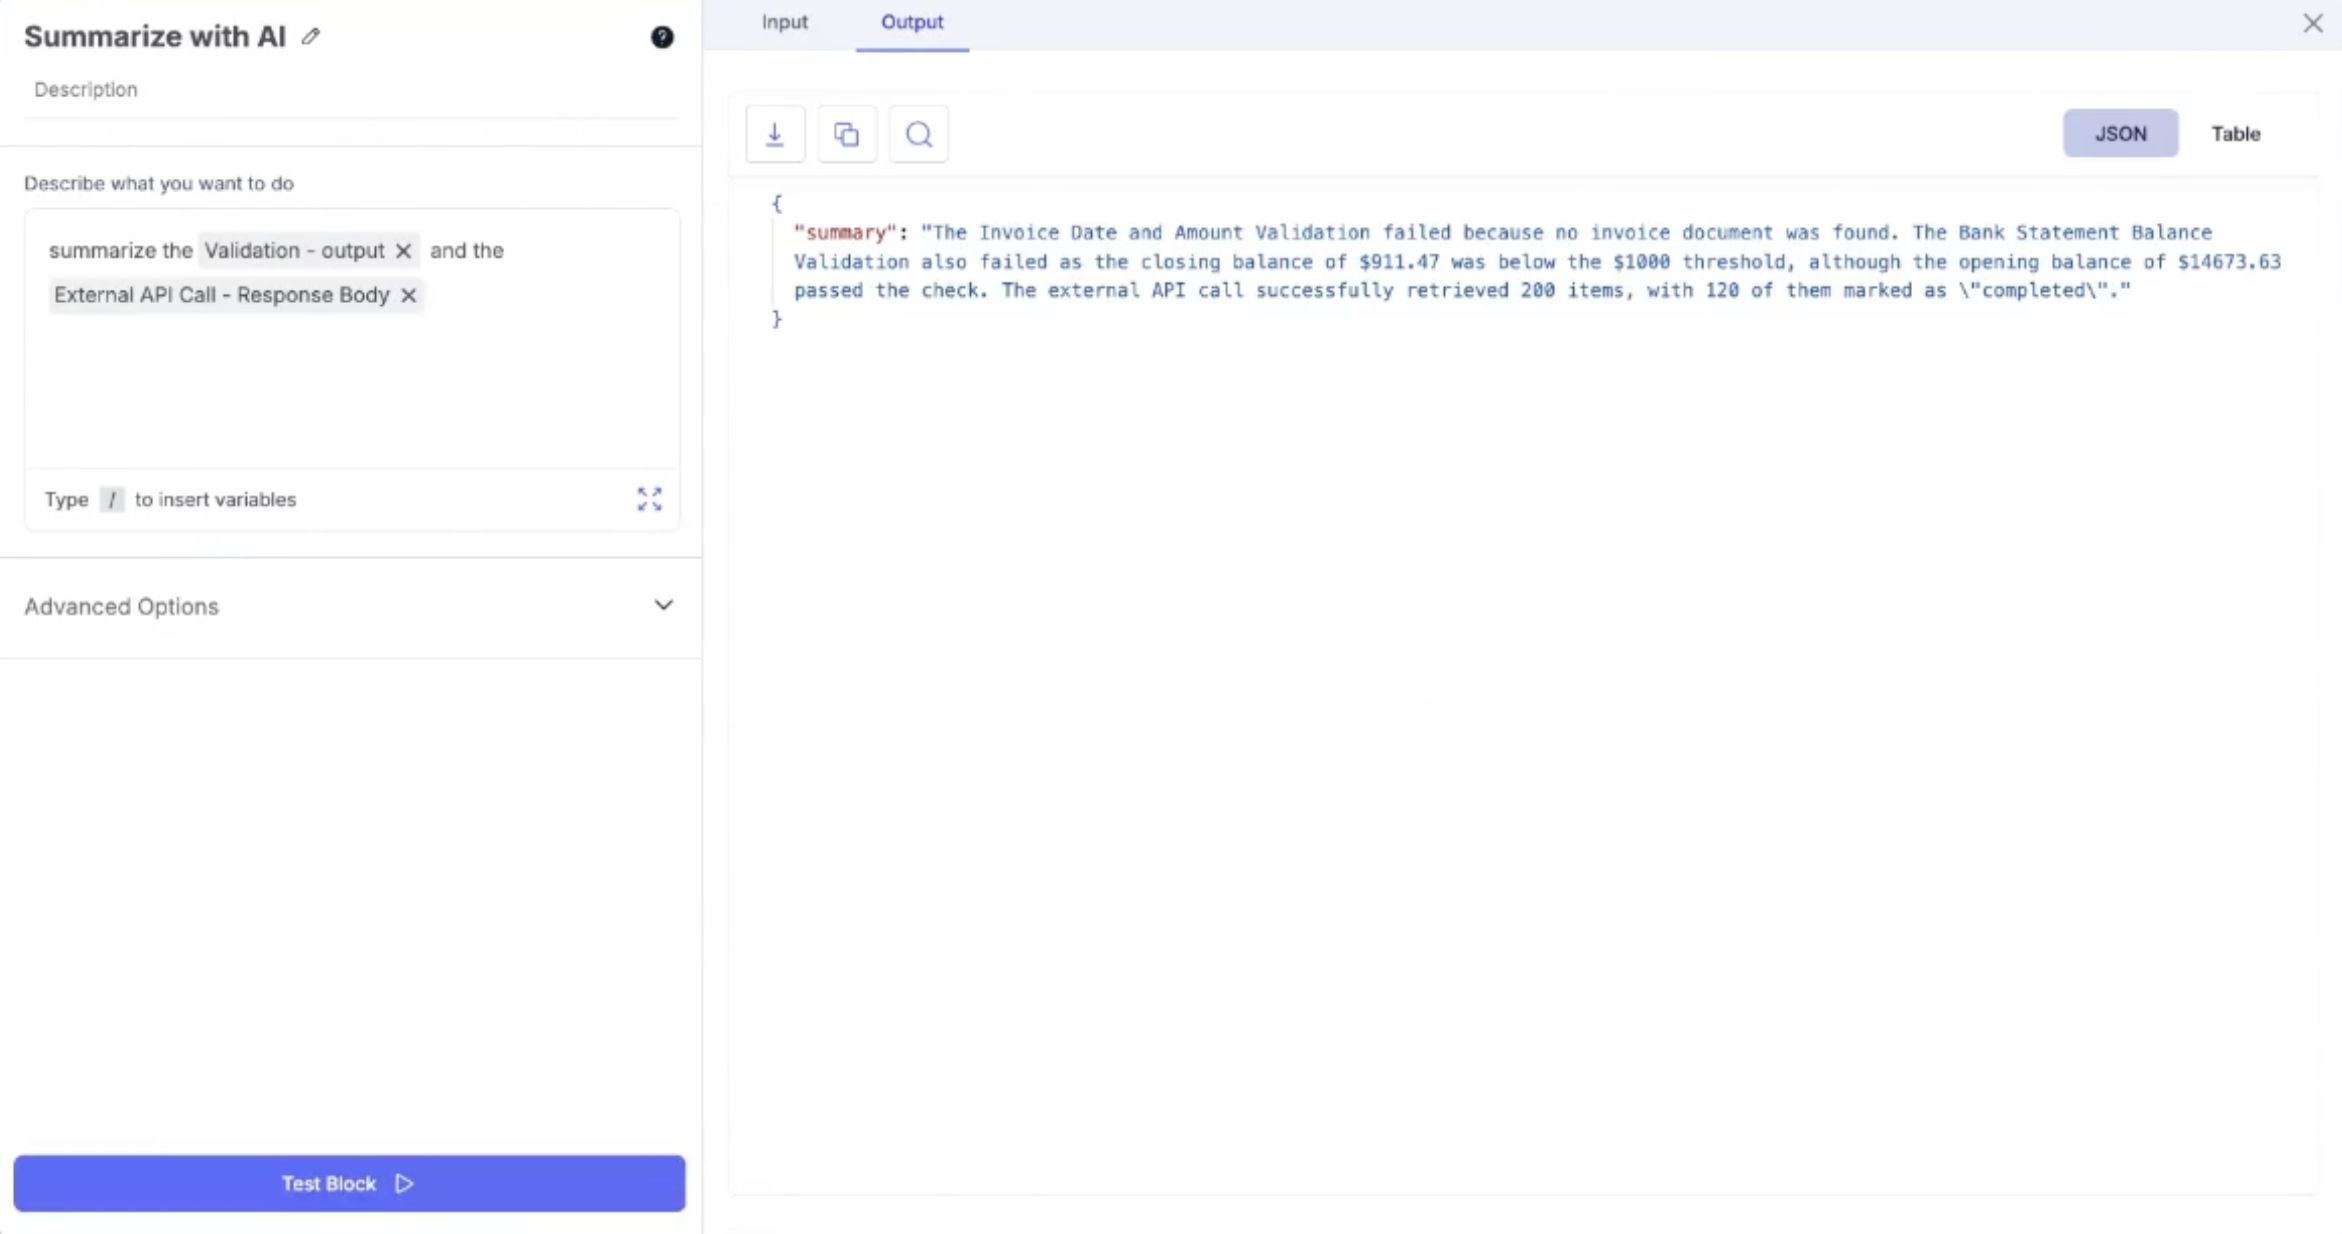
Summarise with AI helps you generate a high-level overview of your workflow by summarising individual blocks and/or selected parts of the workflow. This makes it easier to understand what each workflow is doing without manually reviewing every configuration.
Configuration Steps
- Select Summarise with AI.
- Choose the blocks or workflow sections you want to summarise.
- Select the preview format of the block output
- Generate the AI summary to get a concise overview of the selected workflow parts.
LLM Block
LLM Block allows you to query and generate structured outputs tailored to your cases.
Configuration Steps
- Select LLM Block.
- Enter your Prompt defining what you want the model to generate or infer.
- Map required input fields from your workflow output.
- Define the expected Structured Output Schema to generate new fields.
- Review the configuration and save the block.
- Apply the block to your workflow workflow.
Parser Block
Parser Block helps convert raw text or API responses into structured data. This makes it easier to map outputs to fields and use them in downstream workflow logic.
Configuration Steps
- Select Parser Block.
- Define parsing rules or structure to extract required values.
- Save the configuration and apply the block to your workflow.
Export Block
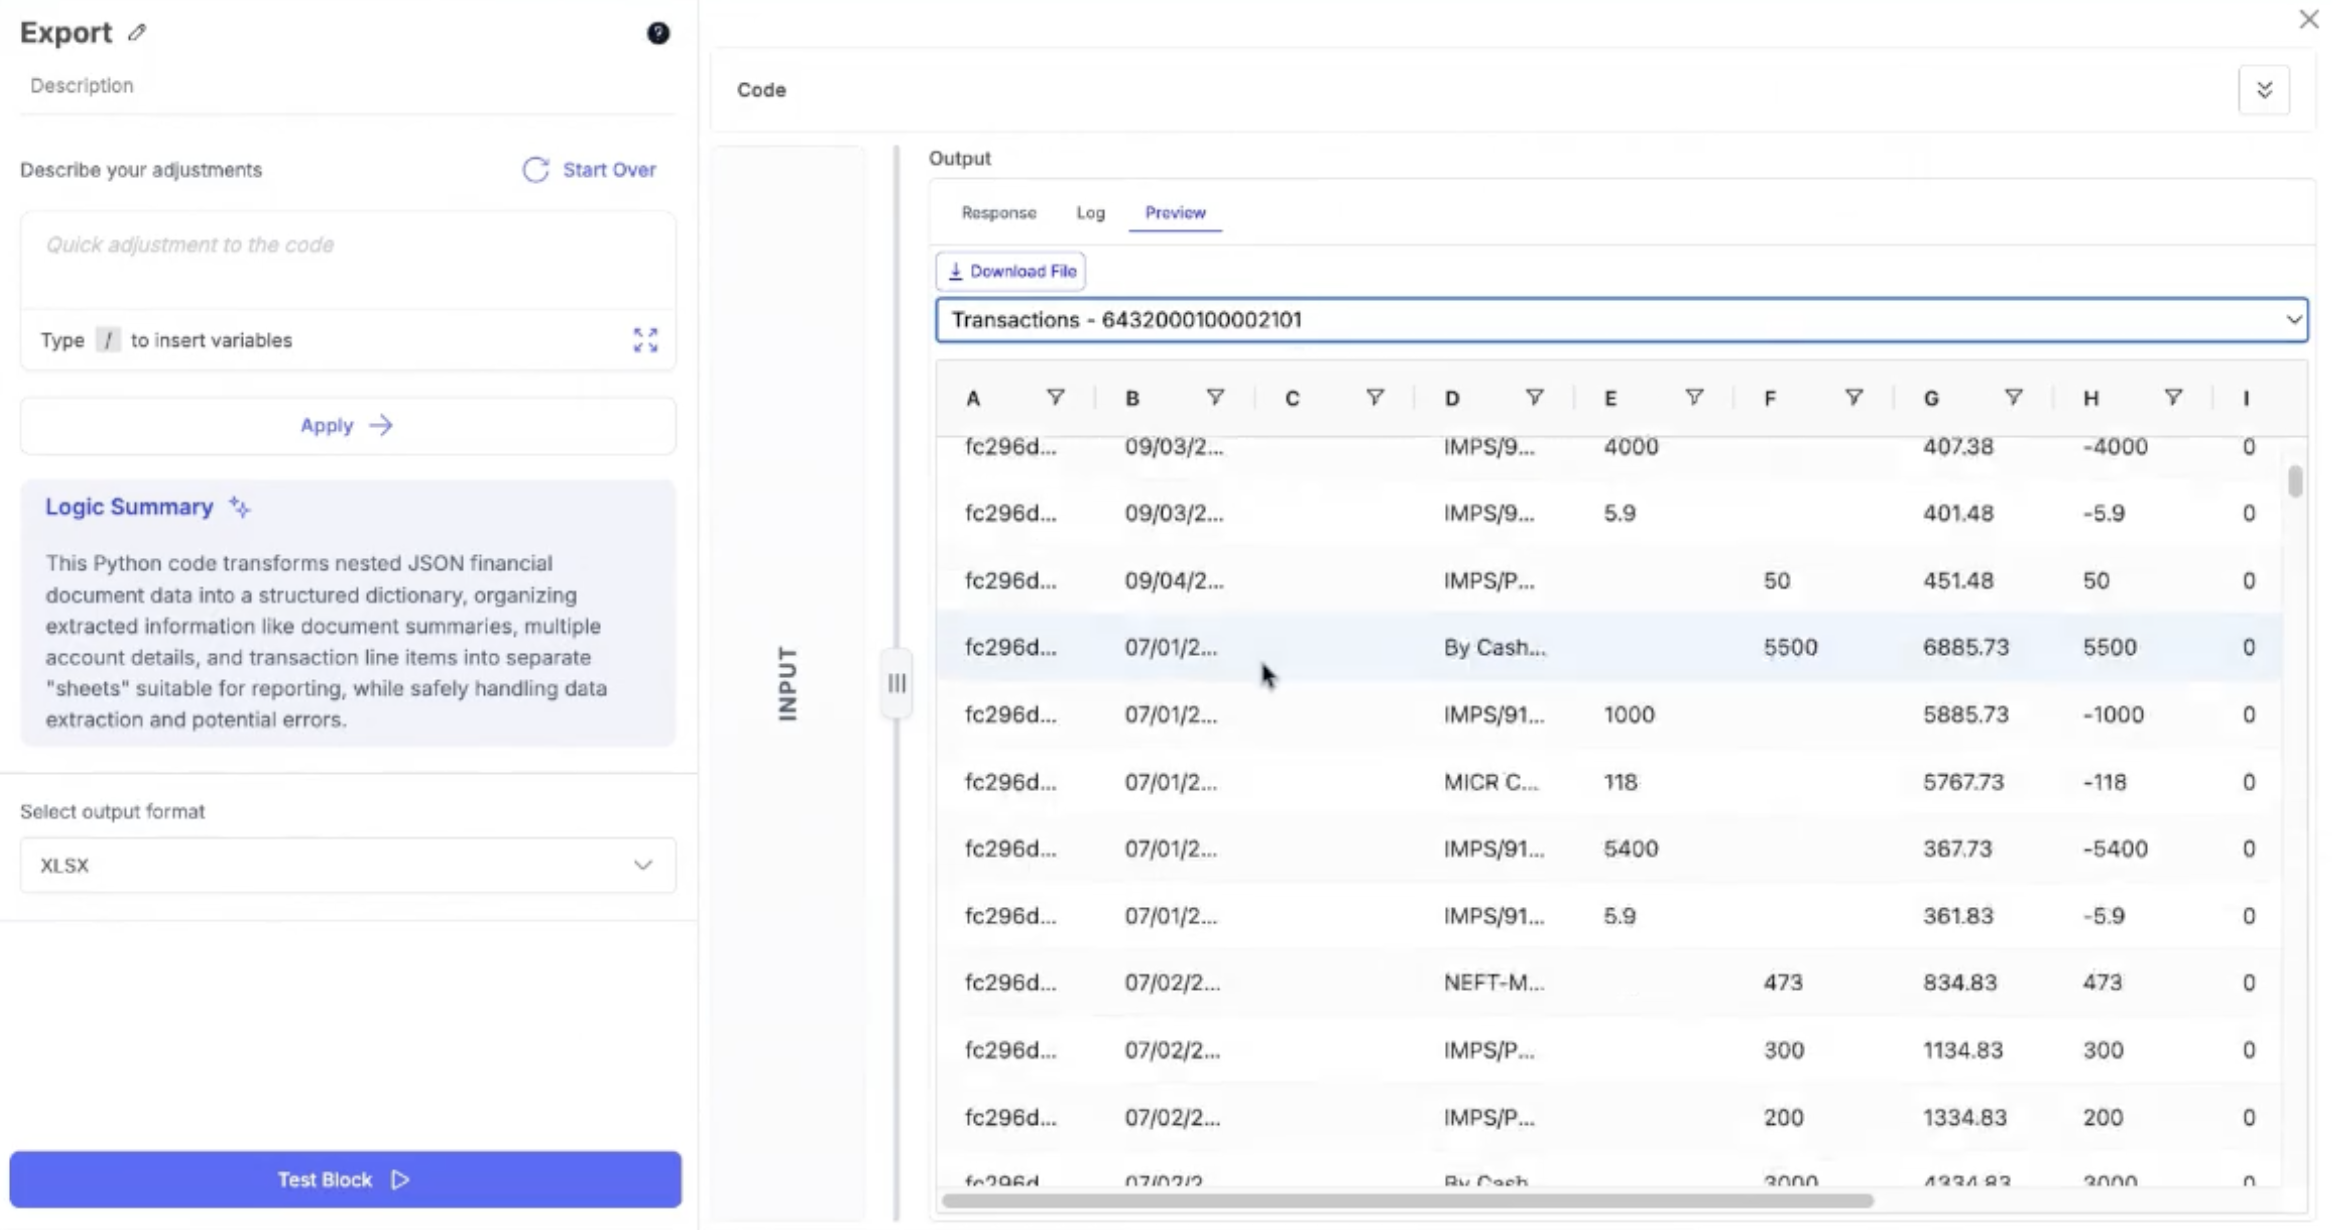
Export Block allows you to generate export-ready structured data from all documents in an workflow. You can define how the final output should look using a prompt, choose the export format, preview the result, and download it directly.
Configuration Steps
- Select Export Block.
- Enter a Prompt describing how you want the exported data to be structured (for example, combined fields, grouped documents, flattened JSON, etc.).
- Select the Export Format (such as JSON, CSV, or other supported formats).
- Use Preview to review the generated export output.
- Once satisfied, Save the configuration and apply the block to your workflow.
- After workflow execution, download the export-ready file.
Example Use Case
For a case containing multiple documents (such as Invoice, Packing List, and Bill of Lading), use Export Block to:
- Combine data from all documents into a single structured output
- Format fields based on downstream system requirements
- Preview the final structure before exporting
- Download clean, standardized data for reporting or system ingestion
This helps teams quickly generate ready-to-use exports without manual formatting or external processing.
Lookup Block
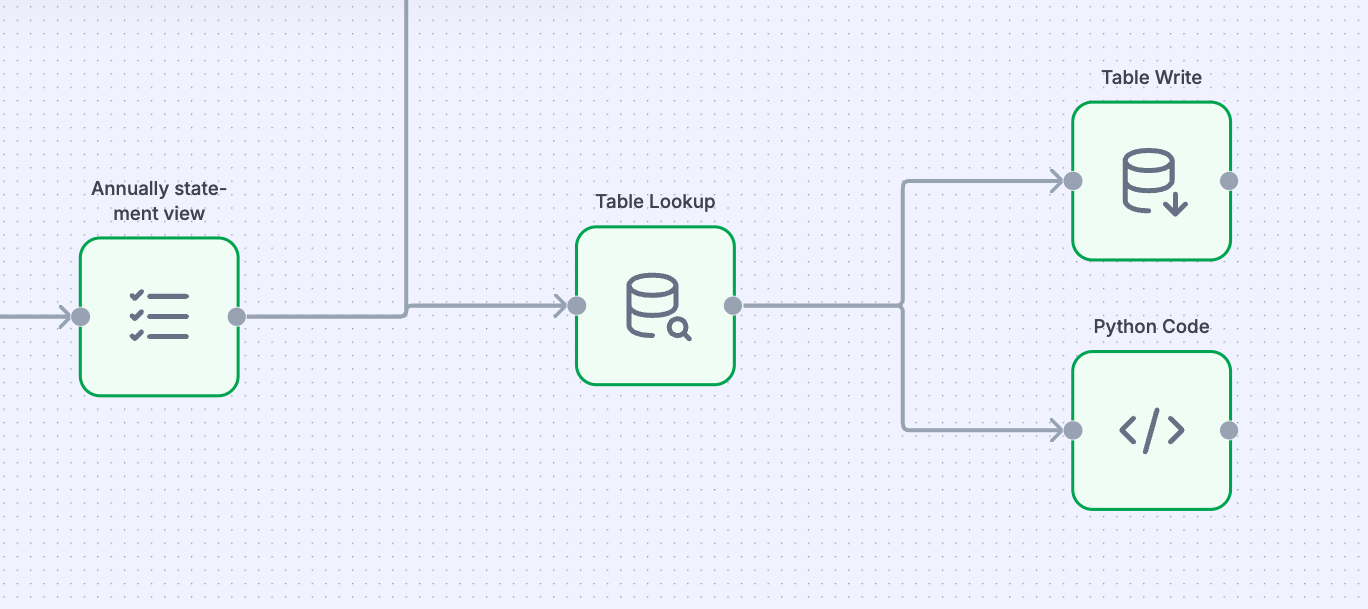
Lookup finds records that match your conditions and hands the matches to later blocks. Look up chooses what it searches:
- Entity: rows in an Entities/Tables table. Enrich or validate against your own reference data.
- Case: cases in a case type. Find the cases a scheduled workflow should act on, or the case an emailed document belongs to.
Look up: Entity
Configuration Steps
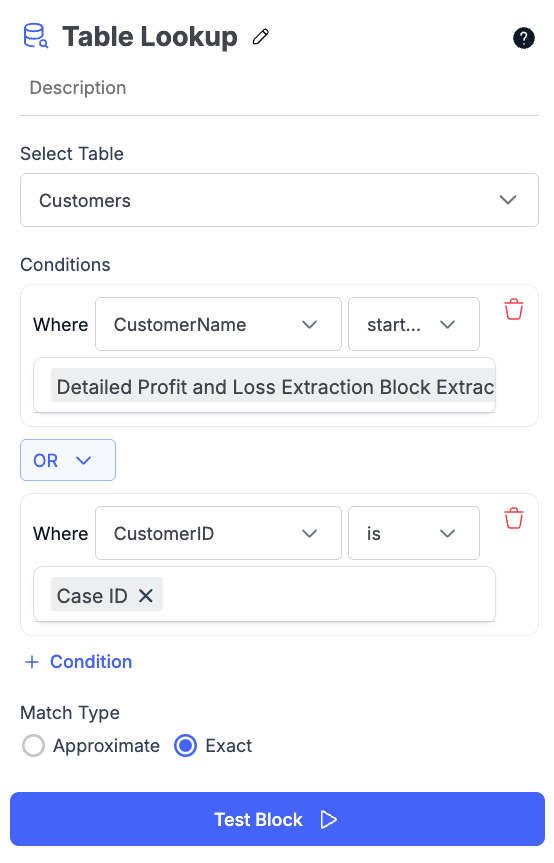
- Select Table: Choose the table or entity to search from the dropdown.
- Conditions: Build the rules a record must satisfy. Each condition compares a table column against a value, which can be typed in or referenced from the case, an extracted document field, or an earlier block. Operators depend on the column type: all types offer is, is not, is empty, and is not empty; String and Dropdown columns add starts with and ends with; Number and Date columns add greater than, at least, less than, and at most.
- Combine Conditions: Use the AND or OR control between conditions to decide whether every rule must match or any one of them.
- Match Type: Select Exact to return only records that satisfy the conditions exactly, or Approximate to allow near matches.
- Match Threshold: Shown only for Approximate matching. Choose how close a record must be, from 70 to 95 percent. The default is 80.
- Test Block: Click Test Block to run the lookup and view the matched records before saving.
Example Use Case
Match an incoming statement to an existing customer. Look up the Customers entity where CustomerName starts with the document title, or CustomerID is the Case ID. The block returns whether a match was found, the match score, and the matched record's columns, all of which later blocks can reference. Pair it with a Router block to send unmatched cases to manual review while matched cases continue automatically.
Look up: Case
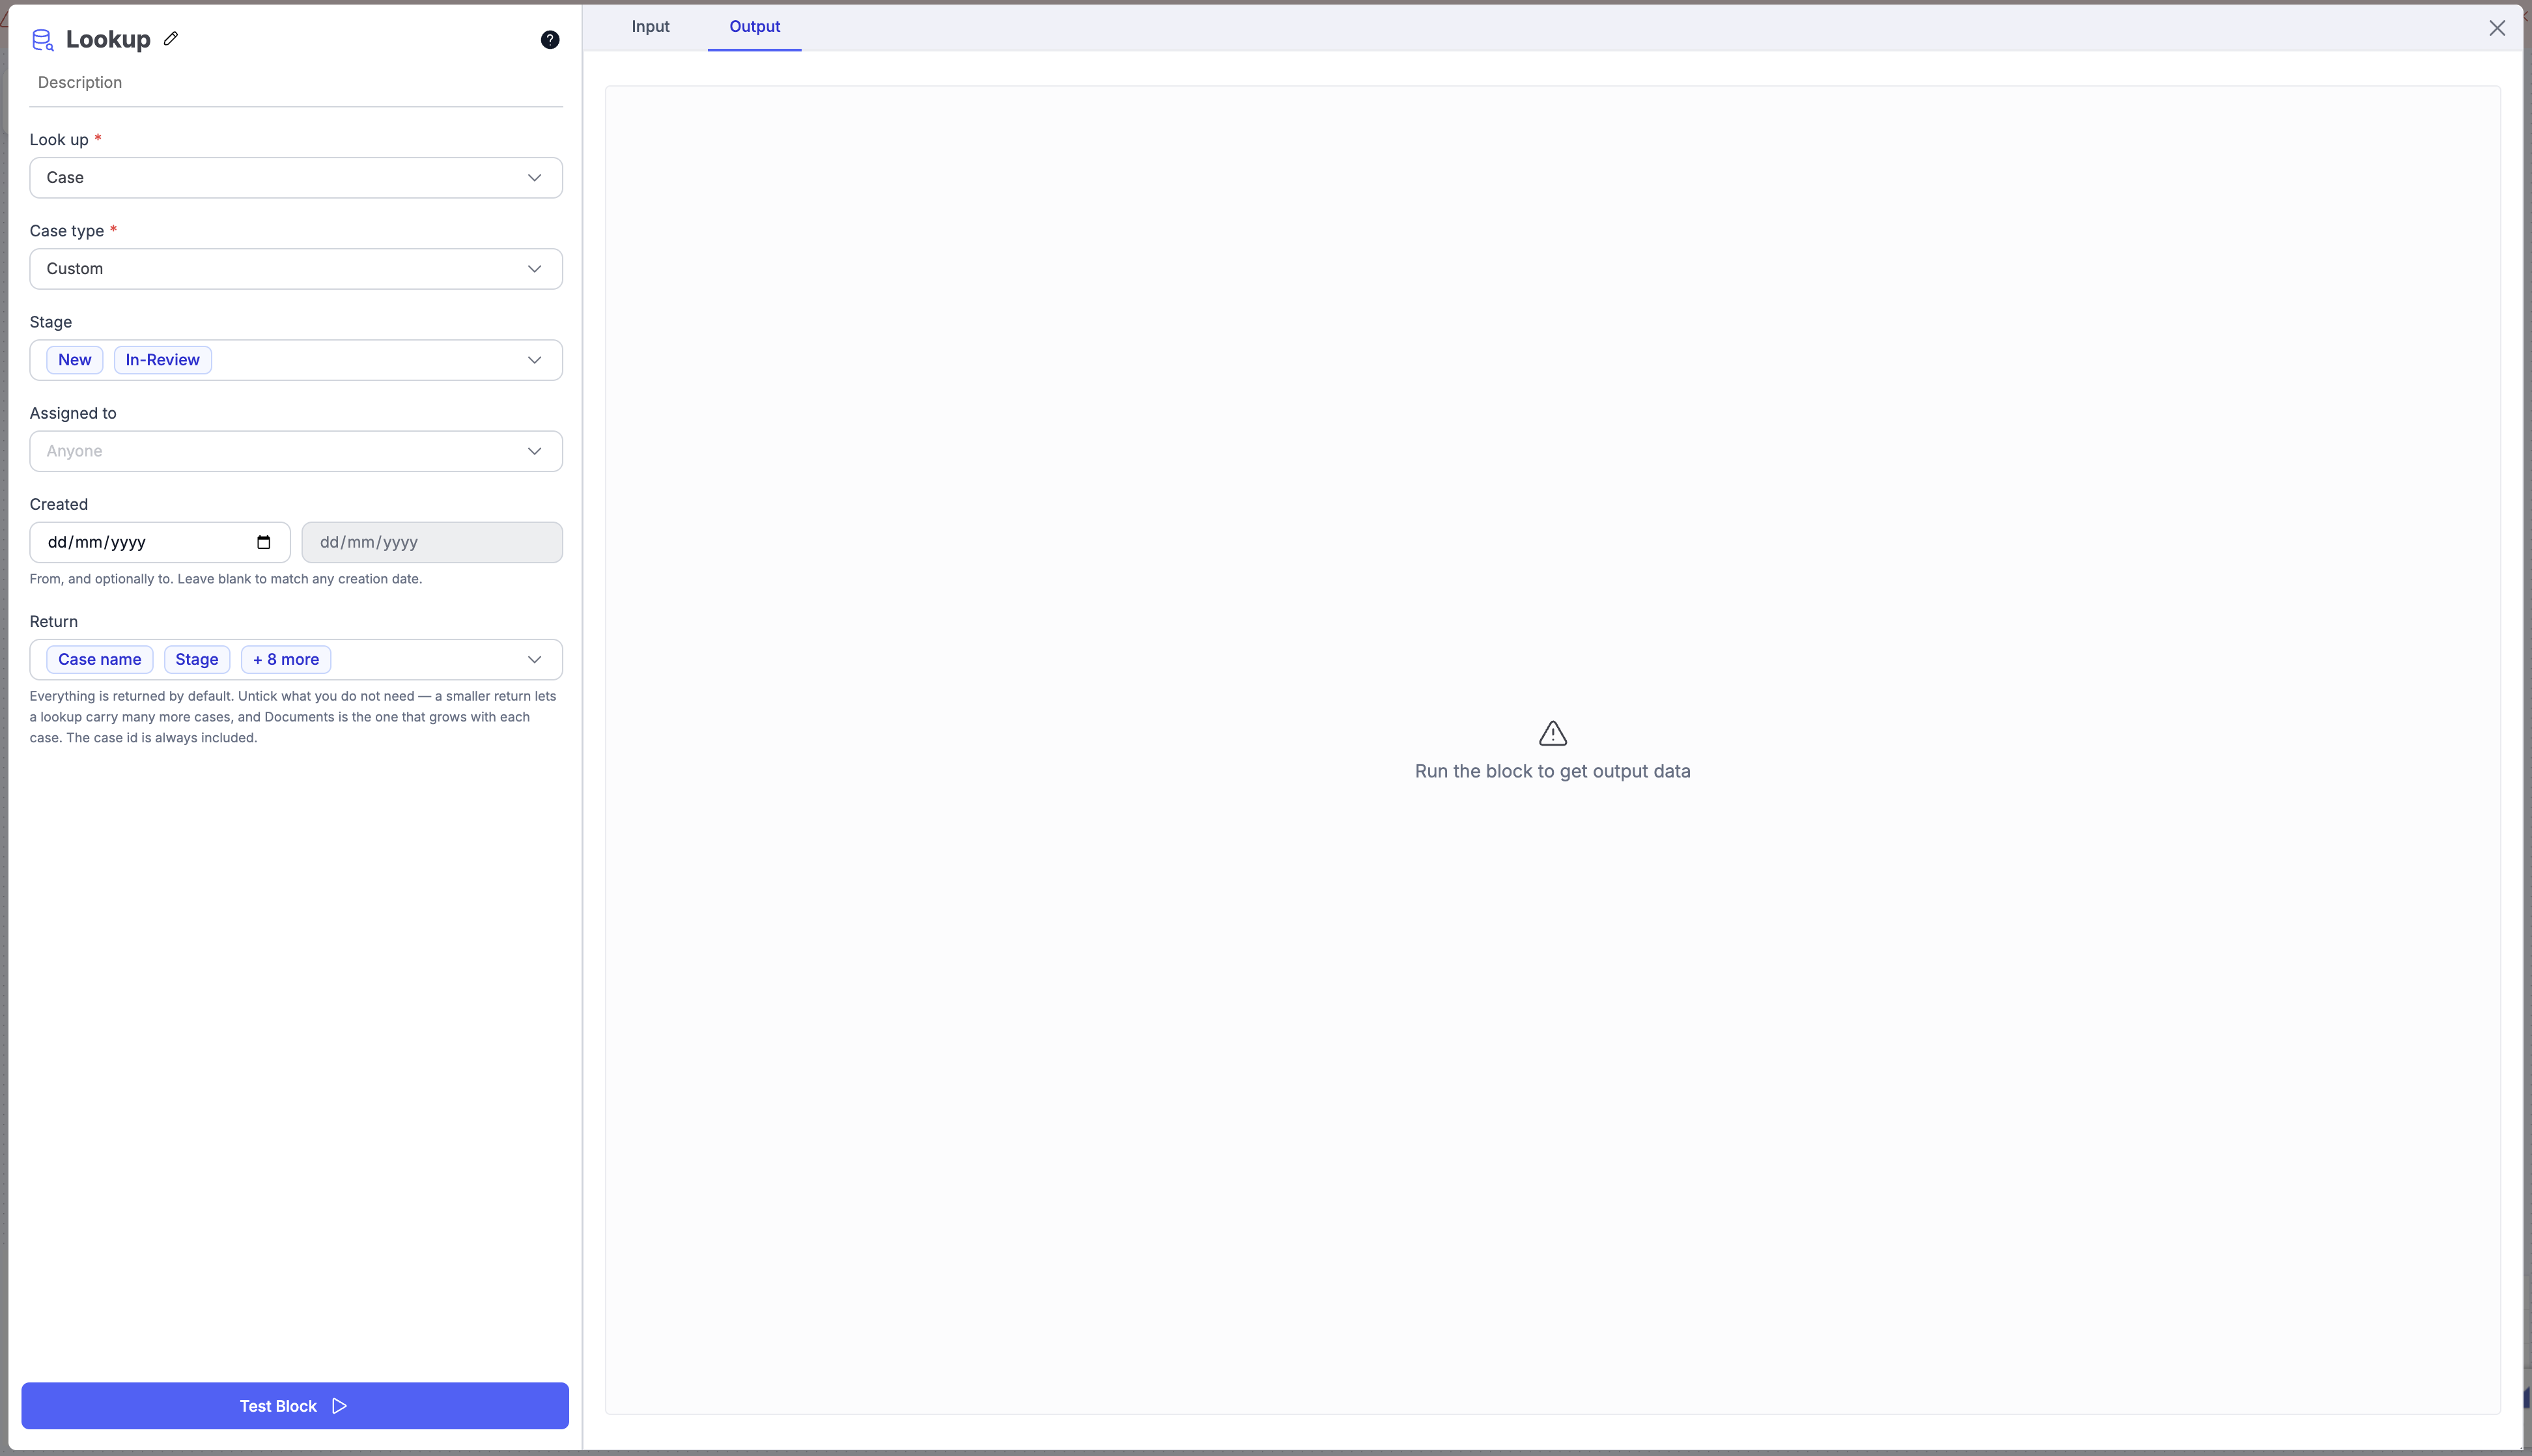
Configuration Steps
- Case type: the case type to search.
- Stage: limit to cases in one stage, or leave Any stage.
- Assigned to: limit to one assignee, or leave Anyone.
- Created: an optional date range.
- Conditions: compare case fields against typed values or references from earlier blocks, the same way as an Entity lookup.
- Return: Case id only, or the case fields you want later blocks to read.
- Test Block: see the matched cases before saving.
The output is the list of matched cases. Reference it from a Case Update or Case Action block, for example /Find cases.matched_case_ids.
Example Use Cases
Nightly sync: on a Schedule trigger, look up cases in Approved created in the last day, then post each to your ERP and move them to Synced with Case Update.
Route an emailed document: on an Upload trigger set to Files, extract the invoice number, look up the case whose Invoice Number field is that value, and hand the match to Case Action to upload the document into it.
A case lookup can return many cases, and every later block acts on all of them. Test the lookup on its own first and check the count in the run detail.
Case Action Block
Case Action acts on cases an earlier block found. It is how a workflow without a case reaches into cases: file a document into the right one, retry or delete cases a Lookup returned, or create a new case for a later block to fill.
Configuration Steps
-
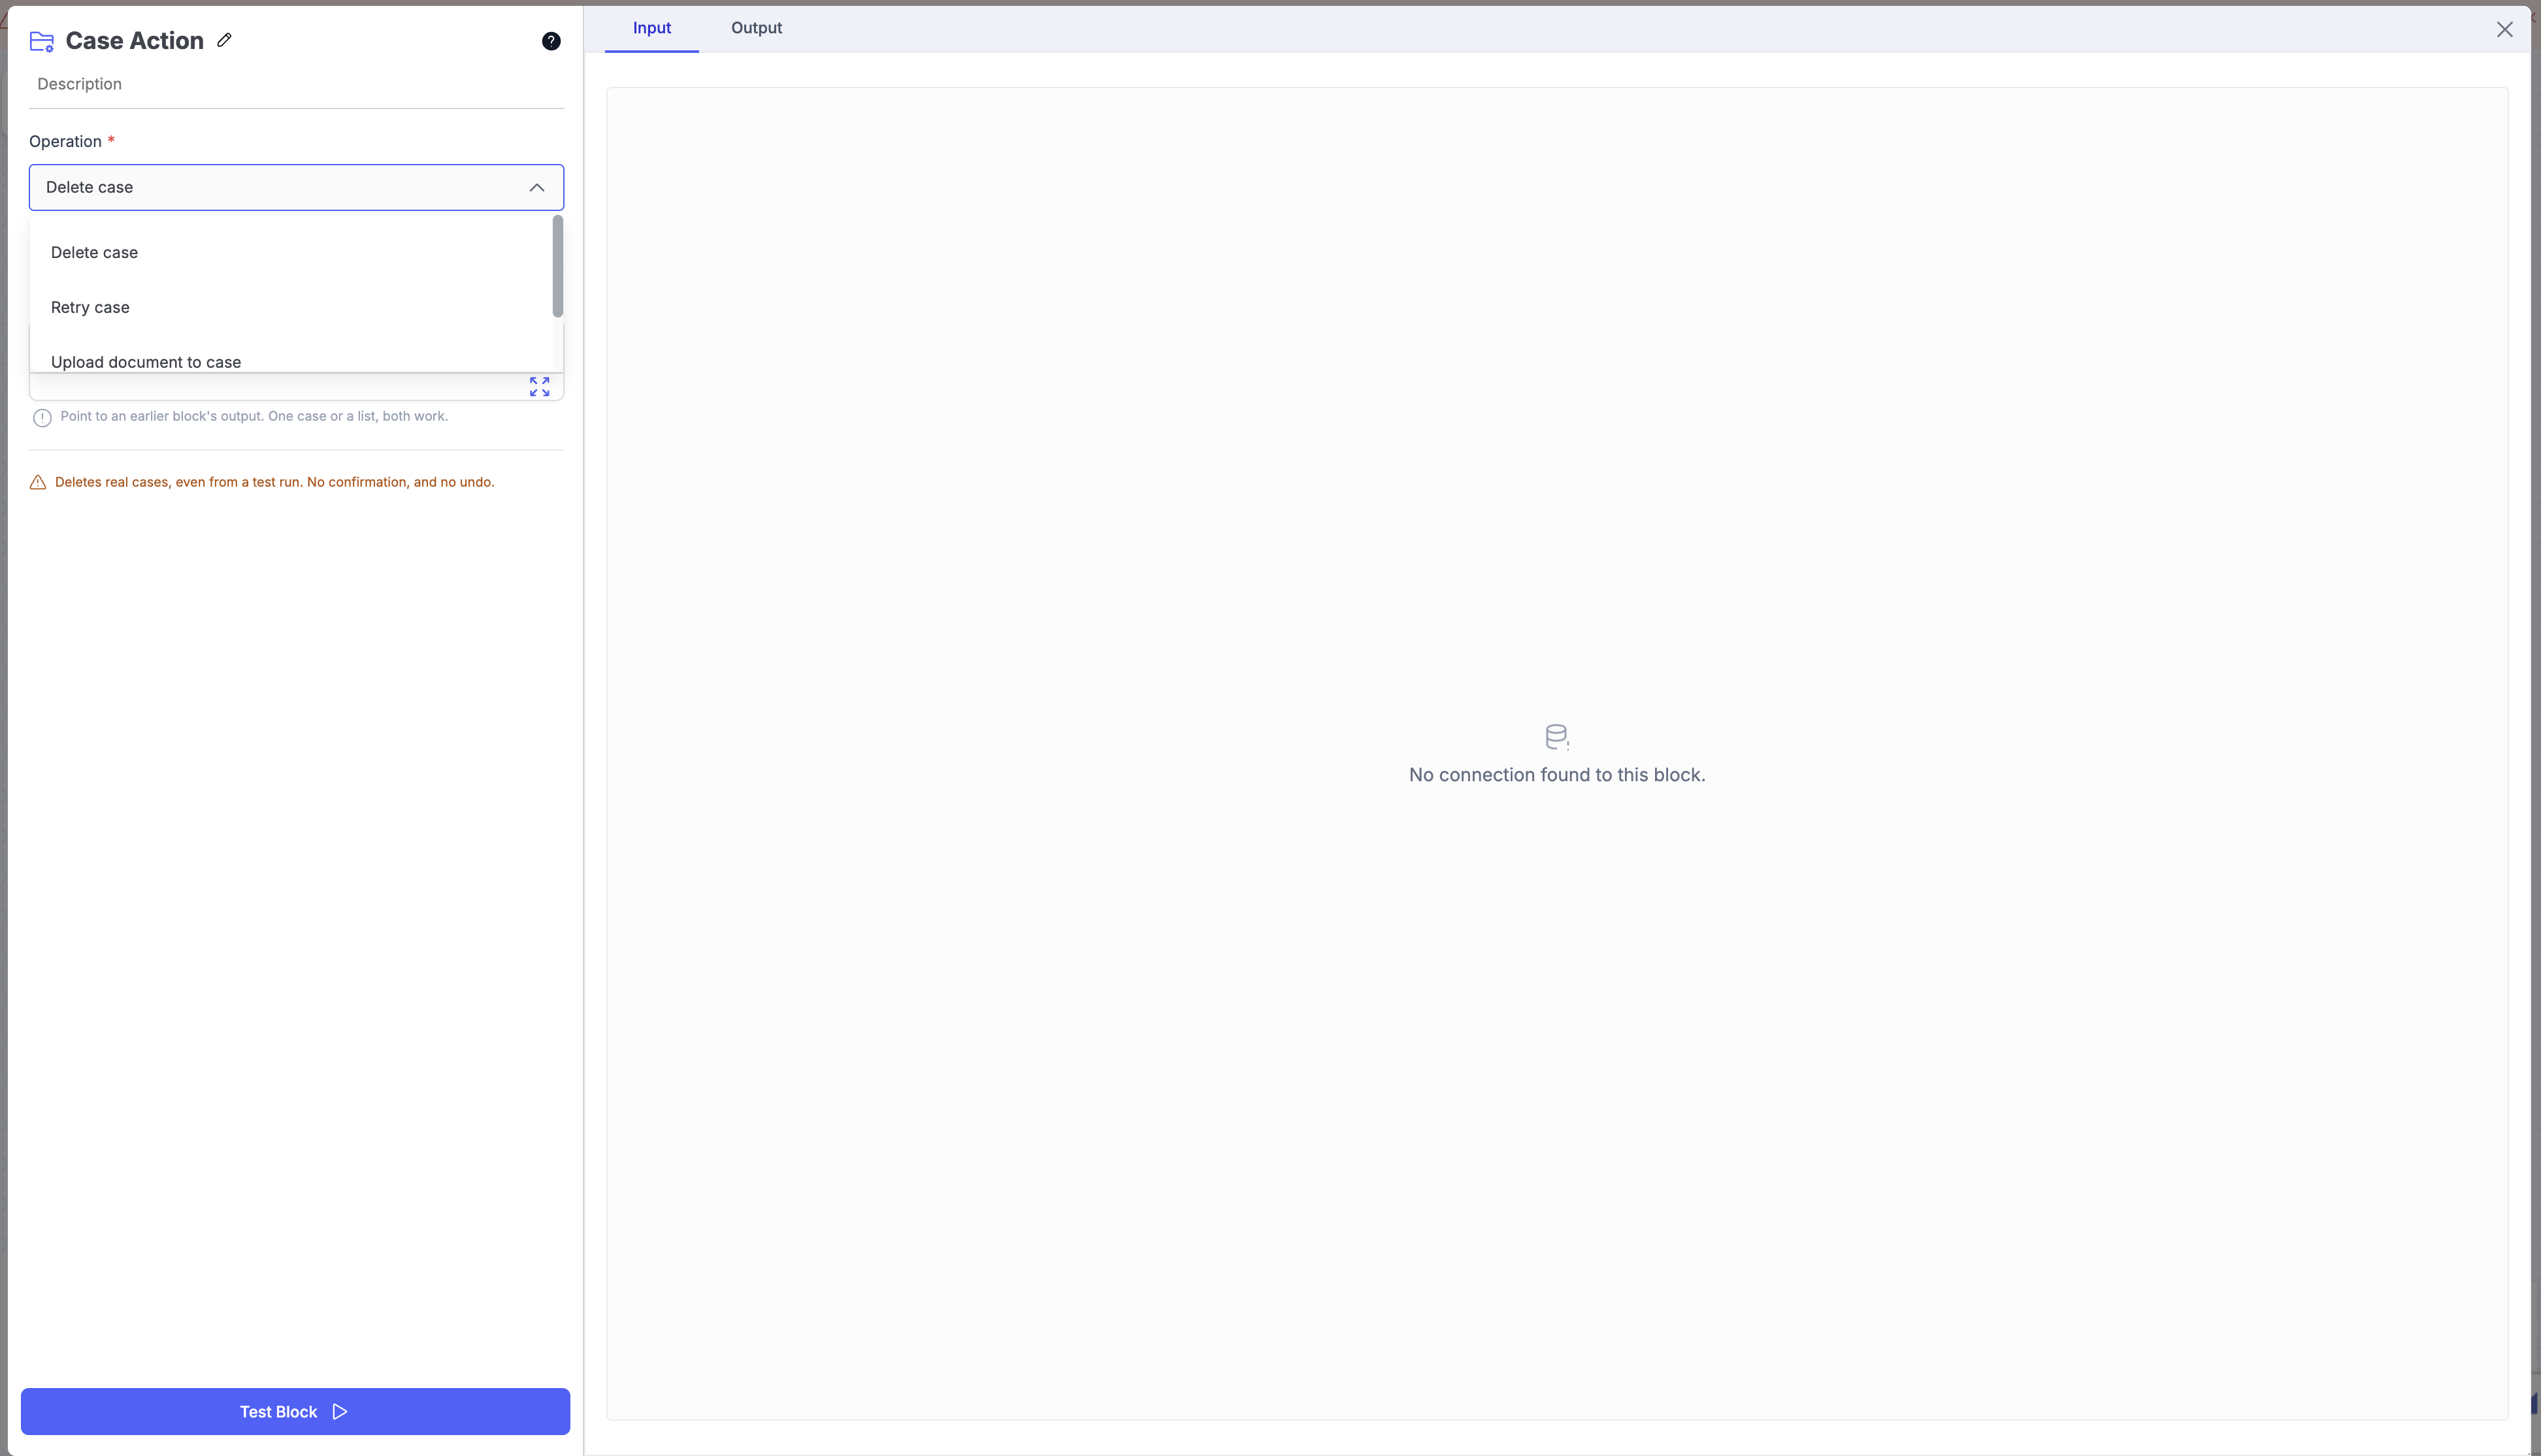
Operation: choose what this block does.
Operation What it does Delete case Deletes every case you point it at. This cannot be undone. Retry case Re-runs each case through its own workflow, the same as Retry on the case list. Upload document to case Uploads the documents into each case as new documents. That case type's workflow then takes over. Create case Creates one case in the case type you choose and returns its details, so a later block can act on it. -
Cases: point to an earlier block's output, for example
/Find cases.matched_case_ids. One case or a list, both work. Not shown for Create case. -
Documents (Upload document to case): links to the files to upload, for example
/Upload trigger.documents. Each one is uploaded into the cases as a new document. -
Case type and Case name (Create case): where to create the case, and an optional name, typed or referenced from extracted data such as
/Extract.invoice_number. -
Test Block: the run detail lists every case the block acted on.
Example Use Case
Route emailed invoices into their cases without a dedicated intake case type:
Upload (Upload as: Files) → Data Extraction → Lookup (Case) → Case Action (Upload document to case)The Upload trigger receives the email, Data Extraction reads the invoice number, Lookup finds the case with that number, and Case Action uploads the PDF into it. The case's own workflow runs from there.
Case Action acts on real cases, even from a test run. There is no limit on how many cases a reference can resolve to, no confirmation, and deletion cannot be undone. Test the Lookup that feeds it first, and check its count before adding Case Action.
Table Write Block
Table Write adds, updates, or deletes records in an Entities/Tables table once a case has been processed, and can link the record to the running case so the record accumulates the cases it relates to.
Configuration Steps
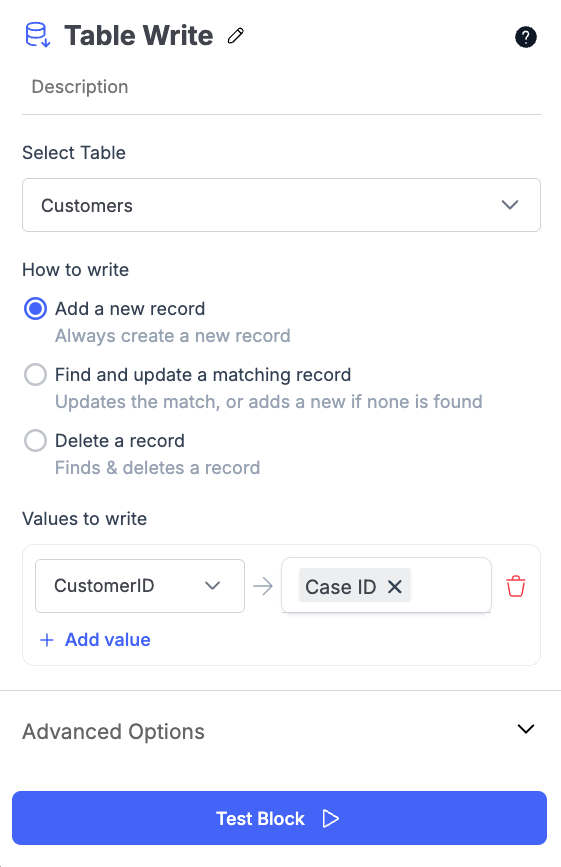
- Select Table: Choose the table or entity to write to.
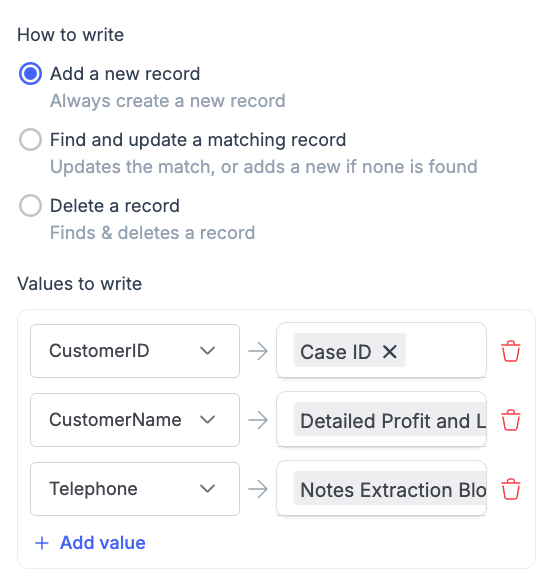
- How to write: Select the operation. Add a new record always creates a record. Find and update a matching record updates the match, or adds a new record if none is found. Delete a record finds and deletes a record.
- Conditions: For update and delete, build the rules that identify which record to act on, in the same way as the Table Lookup block.
- Match Type and Match Threshold: For update and delete, choose Exact or Approximate matching, and set the threshold when matching is approximate.
- How to delete: For delete only, choose Delete best match to remove the single closest record, or Delete all to remove every record that matches.
- Values to write: For add and update, map each target column to a value. Values can be typed in, referenced from extracted fields and case data, or a mix of both. Click Add value to map more columns. Linked Record columns are derived from entity links and cannot be written here, so they are not offered as targets.
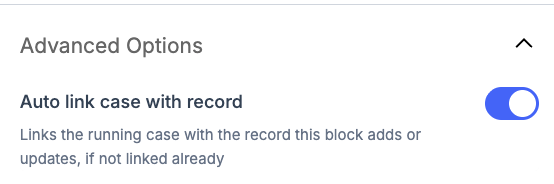
- Advanced Options: Auto link case with record is on by default. It links the running case to the record this block adds or updates, if they are not linked already.
Example Use Case
Keep a customer entity current from incoming documents. Choose Find and update a matching record, match on CustomerID against the Case ID, then map CustomerName and Telephone to the values extracted from the document. Every processed case updates the existing customer or creates one, and with auto link enabled the case appears under that customer's Linked Records.
Lookup and Table Write Best Practices
- Use Lookup before any block that depends on reference data, so downstream routing and validation can act on the result.
- Prefer Exact matching when you are matching on an ID, and Approximate matching when you are matching on names or addresses that vary between documents.
- Raise the match threshold if you see false matches, and lower it if genuine matches are being missed.
- Use Find and update a matching record rather than Add a new record when a case may be processed more than once, to avoid duplicate records.
- Leave Auto link case with record on so that each record accumulates the cases it relates to, which makes the record view useful for audit and review.
Updated about 1 month ago